DIY Wall Mounted Desk for a Small Space
Learn how to build a DIY wall mounted desk for a small space with our step-by-step guide. Includes floating desk plans and home office ideas.
Build Your Dream Workspace: A Step-by-Step Guide to a DIY Floating Desk
If there’s one thing that small-space living has taught me, it’s that every single piece of furniture must justify its existence. And traditional desks, with their bulky legs and large footprints, often fail the test. As the founder of Neat Tiny Home, I’ve spent years searching for and creating solutions that maximize both function and floor space. And when it comes to creating a home office in a tiny home, studio apartment, or a small bedroom nook, no solution is more elegant or efficient than a floating desk. It’s a workspace that seems to magically levitate, providing a sturdy, ample surface without consuming any of the precious floor area beneath it. It’s the ultimate space-saving hack.
This isn’t just a style guide; this is a hands-on, comprehensive workshop. We are going to build your confidence and give you the skills to create a beautiful, custom **DIY wall mounted desk for a small space**. I’ll walk you through everything from the initial planning and material selection to detailed, step-by-step instructions for two different build methods—one for beginners and one for those wanting a truly invisible look. We’ll also cover professional finishing techniques, smart cable management, and a host of other small home office ideas to complete your new workspace. My goal is to demystify the process and show you that with a bit of planning and a weekend of your time, you can build a piece of custom furniture that will transform how you work from home.
Why a Floating Desk is the Ultimate Small Home Office Solution
Before we pick up a single tool, let’s celebrate why a floating desk is such a game-changer. Its benefits go far beyond just looking cool. For anyone struggling to carve out a functional workspace in a limited area, this style of desk solves multiple problems at once. It’s a minimalist’s dream, a testament to the idea that good design can create both beauty and utility in equal measure. Understanding these core advantages will help motivate you through the building process and solidify why a **DIY wall mounted desk for a small space** is one of the most rewarding projects you can undertake for your home. It’s a choice that pays dividends in productivity, style, and a wonderful sense of spaciousness.
The Magic of “Floating” Furniture: Reclaiming Your Floor Space
The most obvious and impactful benefit is the reclaimed floor space. By eliminating the legs, you create an open, airy feeling that makes a small room feel significantly larger. The uninterrupted floor line draws the eye further into the room, creating an illusion of depth. This newfound space isn’t just visual; it’s practical. You can now easily vacuum underneath, store a rolling file cabinet that can be moved when you need legroom, or even tuck away a stylish storage ottoman. This single design choice combats the cramped feeling that so often plagues small home offices and is a core principle of effective tiny home design.
The Psychological Impact of a Minimalist Workspace on Productivity
Our physical environment has a profound impact on our mental state. A cluttered, bulky desk can feel oppressive and contribute to a scattered mind. A floating desk, by its very nature, encourages minimalism. Its clean lines and open space beneath promote a sense of order and calm, which can directly translate to improved focus and productivity. As detailed in neuroscience studies from institutions like Princeton, a less cluttered visual field allows our brains to process information more effectively. Building a minimalist workspace isn’t just an aesthetic choice; it’s a tool for enhancing your work. Creating this type of focused environment is one of the best small home office ideas you can implement.
Is a DIY Floating Desk Right for You? A Pre-Project Checklist
This project is fantastic, but it’s not for everyone. Here’s a quick checklist to help you decide:
- Do you own your home, or does your landlord permit drilling into walls? This is a non-negotiable, as the desk must be securely anchored to the wall studs.
- Are you comfortable with basic tools? You’ll need to be able to use a drill, a level, and a stud finder.
- What is your wall made of? This project is designed for standard drywall over wood or metal studs. Plaster or masonry walls will require different, more specialized hardware.
- How much weight do you need it to hold? A properly installed floating desk is very strong, but if you have extremely heavy equipment (like multiple large monitors and speakers), you’ll need to opt for heavy-duty brackets.
Planning Your Build: Design, Materials, and Measurements
A successful DIY project is 90% planning and 10% execution. Taking the time to think through every detail before you buy or cut anything will save you from frustrating mistakes and extra trips to the hardware store. This is the phase where you customize your **DIY wall mounted desk for a small space** to your exact needs and aesthetic. From choosing the perfect piece of wood to selecting the right support system, these initial decisions will define the final outcome of your project. Let’s break down the planning process into four simple, manageable steps.
Step 1: Choosing the Perfect Location and Taking Measurements
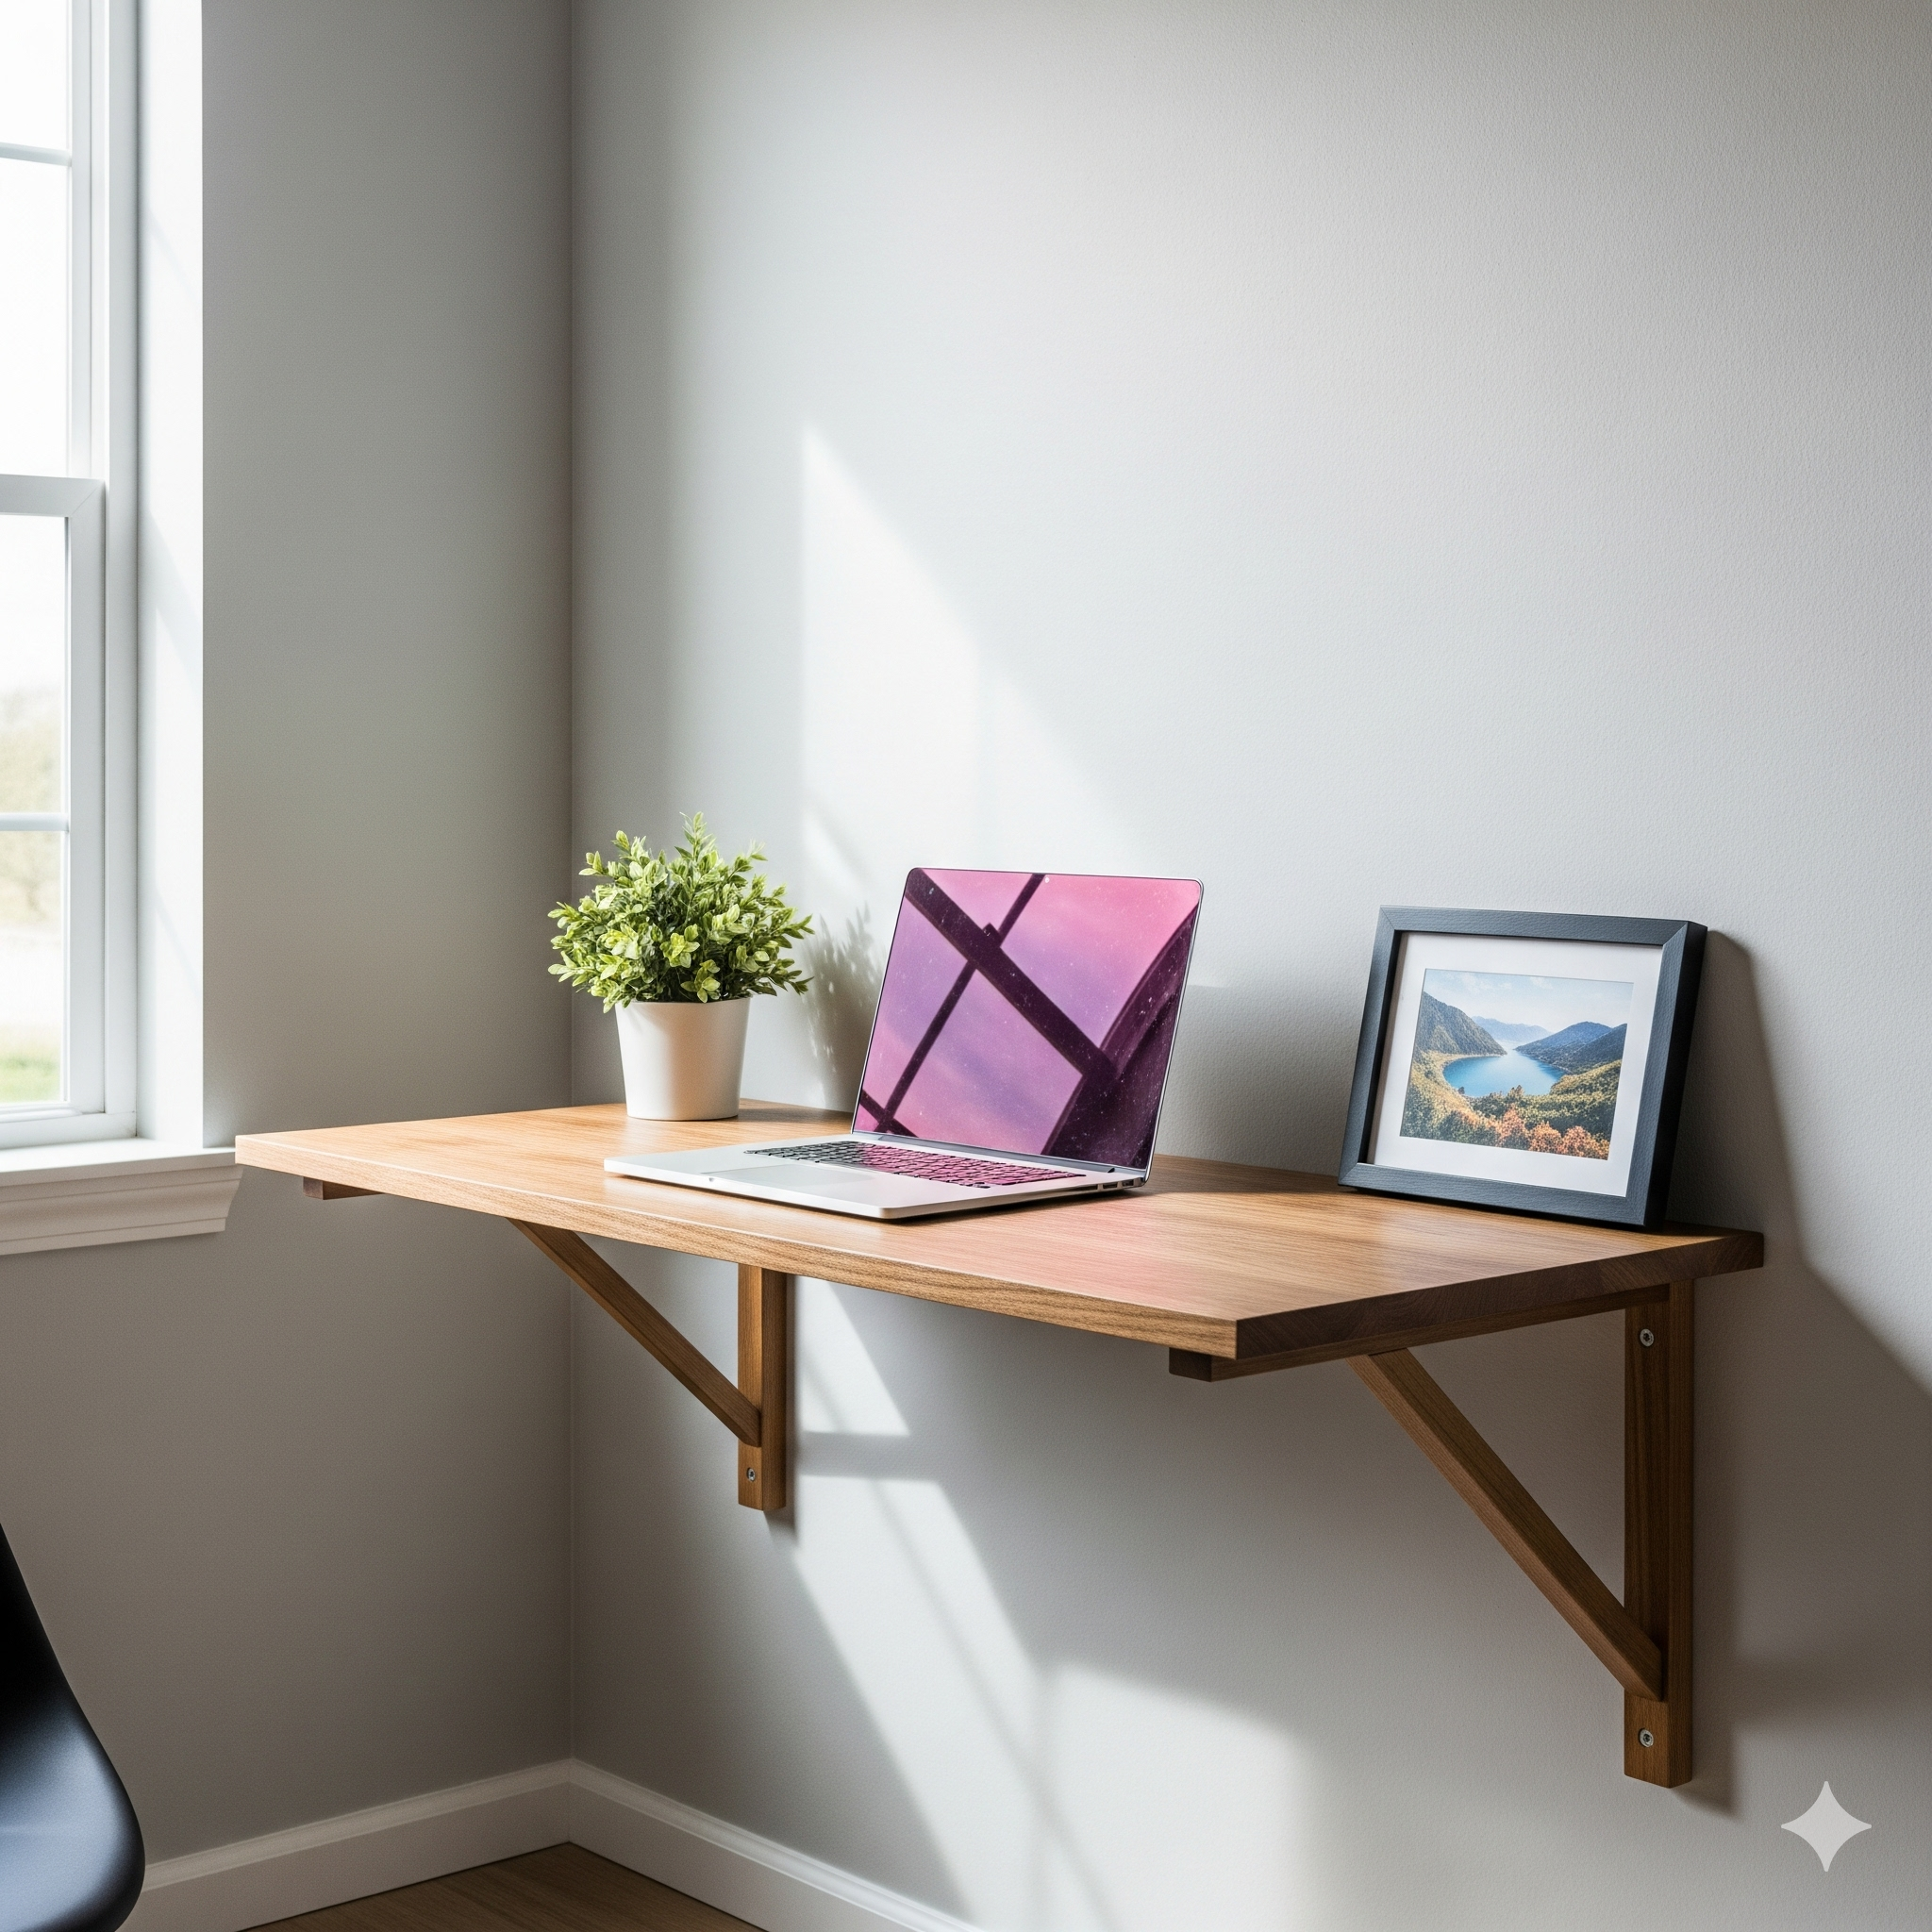
Walk around your space and identify the best nook or wall for your desk. Consider factors like proximity to power outlets and natural light. Once you’ve chosen your spot, decide on the ideal dimensions. A comfortable desk depth is typically between 20-24 inches, and the length can be whatever fits your space. The standard ergonomic desk height is 29-30 inches from the floor to the top of the desk surface. Use painter’s tape to mark the outline of the desk on the wall. This will help you visualize the final size and ensure it doesn’t overwhelm the space or interfere with walkways. This visual guide is a crucial first step in any good set of **floating desk plans**.
Step 2: Selecting Your Desktop Material
The desktop is the star of the show! You have several great options depending on your budget and desired look:
- Sanded Plywood: Incredibly affordable and offers a modern, Scandinavian vibe. A high-quality birch or oak plywood will look fantastic.
- Butcher Block: A solid, durable, and beautiful option. You can often buy pre-made butcher block countertops from stores like The Home Depot or Floor & Decor.
- Live Edge Slab: For a stunning, rustic look, a live edge slab of wood is unmatched, though it’s the most expensive option.
- Laminated Shelving: The easiest option. You can buy pre-finished shelving boards in standard depths, which requires no finishing work from you.
Step 3: Understanding Support Systems
How your desk “floats” is the most critical technical decision. There are three main methods, each with its own pros and cons.
| Support System | Skill Level | Aesthetic | Weight Capacity |
|---|---|---|---|
| Heavy-Duty L-Brackets | Beginner | Industrial / Visible | Very High |
| Hidden / Blind Brackets | Intermediate | Truly “Floating” / Invisible | Medium to High |
| Wall Cleat / Torsion Box | Advanced | Sleek / Invisible | Extremely High |
For this tutorial, we will focus on the two most accessible methods: L-Brackets and Hidden Brackets. Both provide excellent support when properly installed into wall studs.
Method 1: The Simple & Sturdy L-Bracket Floating Desk (Beginner Friendly)
This method is straightforward, incredibly strong, and perfect for your first **DIY wall mounted desk for a small space**. The visible brackets lend a cool, industrial-chic vibe. The key to success is finding the wall studs, as drywall alone will not support any weight.
Step-by-Step Instructions:
- Find and Mark Your Studs: Use a high-quality stud finder to locate the vertical wood studs within your wall. Mark their centers with a pencil. You’ll want to anchor at least two brackets into two separate studs. For a long desk, use three brackets.
- Mark Your Height: Using your painter’s tape line as a guide (typically 29-30 inches from the floor), use a level to draw a faint, perfectly level pencil line across the wall where the top of your desk will be.
- Mount the Brackets: Position your first L-bracket so the top is just below your pencil line, ensuring the screw holes are centered over a stud. Use a drill to secure the bracket to the wall with long, heavy-duty screws (at least 2.5 inches long). Repeat for the second (and third) bracket, using your level to ensure they are perfectly aligned with each other. A great guide on finding studs can be found from home improvement experts like Bob Vila.
- Attach the Desktop: Place your finished desktop on top of the brackets. From underneath, use shorter screws to attach the desktop to the brackets through the provided holes. Make sure your screws are shorter than the thickness of your desktop to avoid them poking through the top!
And that’s it! You have a sturdy, functional floating desk. This is one of the most reliable **floating desk plans** you can follow.
Finishing and Customizing Your DIY Wall Mounted Desk
A raw piece of wood is functional, but a beautifully finished one is a piece of art. This final stage is what will make your desk look like a high-end piece of custom furniture rather than a simple DIY project. It’s also where you can add clever features to enhance its functionality, truly tailoring it to your needs.
Sanding and Staining/Painting for a Professional Finish
Before you mount your desktop, proper finishing is key. Start by sanding the entire surface and all edges with medium-grit sandpaper (like 120-grit) and then finish with a fine-grit sandpaper (220-grit) for a silky-smooth feel. Always sand in the direction of the wood grain. After wiping away all the dust, apply your finish. A wood stain will enhance the natural grain, while a durable paint can add a pop of color. I am a big fan of the stains and finishes from Minwax for their quality and ease of use. Always finish with at least two coats of a protective polyurethane sealer (in matte, satin, or gloss) to protect the surface from scratches and spills.
Adding Cable Management: Grommets and Channels
Visible cable clutter can ruin the clean, minimalist aesthetic of your floating desk. Plan your cable management from the start. You can drill a hole in the back corner of the desk and install a plastic or metal desk grommet for a clean way to pass cables through. For a truly professional look, you can mount a cable channel or raceway to the underside of the desk. This trough will hold a power strip and all your excess cables, keeping them completely out of sight. This small detail is one of the most impactful small home office ideas for maintaining a tidy look.
Building your own furniture is an incredibly empowering experience. This **DIY wall mounted desk for a small space** is more than just a project; it’s a way to reclaim your space and create a personalized, productive environment that you can be proud of. Take your time, enjoy the process, and get ready to love your new home office.
Frequently Asked Questions (FAQ)
How much weight can a DIY floating desk actually hold?
When installed correctly into wall studs, it can hold a significant amount of weight. A desk mounted with two heavy-duty steel L-brackets can typically hold 100-200 pounds or more (always check the manufacturer’s rating on the brackets). The key is the anchor point; the strength is in the studs, not the drywall.
What if the studs aren’t in the right place for my desk?
This is a common problem. If the studs are not symmetrically placed where you want your brackets, you have a couple of options. The best solution is to first mount a horizontal support board (a 1×4 or 1×6 piece of wood) to the wall, screwing it securely into whatever studs are available. You can then mount your brackets anywhere you want along that support board. Paint the board the same color as the wall to help it blend in.
Can I make a floating corner desk?
Absolutely! A floating corner desk is a fantastic use of space. The process is similar, but you will create two desktop pieces that meet at the corner. You’ll need to support both pieces with brackets mounted into the studs on both walls. The corner where the two pieces meet will also need support, often from a bracket mounted into the corner stud or from a cleat system on both walls.

Post Comment