Best Peel and Stick Backsplash for a Rental Apartment

Find the best peel and stick backsplash for a rental apartment and learn to install it with our DIY guide. A perfect kitchen makeover on a budget!
Commitment-Free Kitchen Makeover: A DIY Guide to Installing Peel and Stick Backsplash
There’s a universal truth for anyone who has ever lived in a rental: the kitchen is often the most dated, uninspired room in the house. You might be blessed with decent appliances, but you’re often stuck with boring beige walls, a questionable countertop, and zero personality. As someone who has lived in my fair share of small apartments and now champions creative living at Neat Tiny Home, I know the feeling of wanting to make a space your own without risking your security deposit. For years, a beautiful tiled backsplash was a distant dream for renters. It was a messy, expensive, and permanent renovation. But I’m here today with some truly fantastic news: that is no longer the case. The invention of high-quality peel and stick tiles has completely changed the game.
This is your ultimate, definitive guide to transforming your kitchen with a **temporary backsplash**. We are going to cover everything you need to know, starting with how to choose the absolute **best peel and stick backsplash for a rental apartment**—because quality varies wildly, and I want you to get a result that looks like real tile, not a cheap sticker. Then, I will walk you through a meticulous, step-by-step installation process that will leave you with a flawless finish. This project is the definition of a **kitchen makeover on a budget**. For less than a hundred dollars and a weekend of your time, you can dramatically elevate the look and feel of your kitchen. Say goodbye to boring walls and hello to a kitchen that finally feels like you.
The Renter’s Renovation: Why Peel and Stick is a Kitchen Game-Changer
Before we get into the nitty-gritty of installation, let’s take a moment to appreciate why this product is so revolutionary, especially for renters and tiny home dwellers. A backsplash isn’t just a decorative element; it’s a functional workhorse. It protects your walls from splashes, grease, and food splatters, making cleanup a breeze. But aesthetically, it’s the single most impactful visual upgrade you can make in a kitchen. It adds color, pattern, and texture, tying the whole room together. Peel and stick tiles allow you to get all these benefits without any of the traditional downsides. There’s no messy mortar, no complicated tile saws, no grout, and most importantly, no permanent commitment. It’s the perfect solution for anyone wanting to make a big impact with a small budget and zero risk.
Dispelling the Myths: Is It Durable? Will It Look Cheap?
Let’s address the elephant in the room. When peel and stick tiles first came out, many of them did look cheap. They were often thin, flat, and had a plastic-y sheen. However, the technology has improved exponentially. The **best peel and stick backsplash for a rental apartment** today features 3D gel-poured surfaces that realistically mimic the look and feel of real ceramic or glass tile. There are options made from real stone veneer, brushed metal, and high-quality vinyl that are nearly indistinguishable from their permanent counterparts once installed. In terms of durability, high-quality tiles are specifically designed to be heat-resistant (safe behind most stoves, though always check manufacturer specs) and humidity-resistant. They are incredibly easy to clean and will last for years with proper care, all while being fully removable when it’s time to move out.
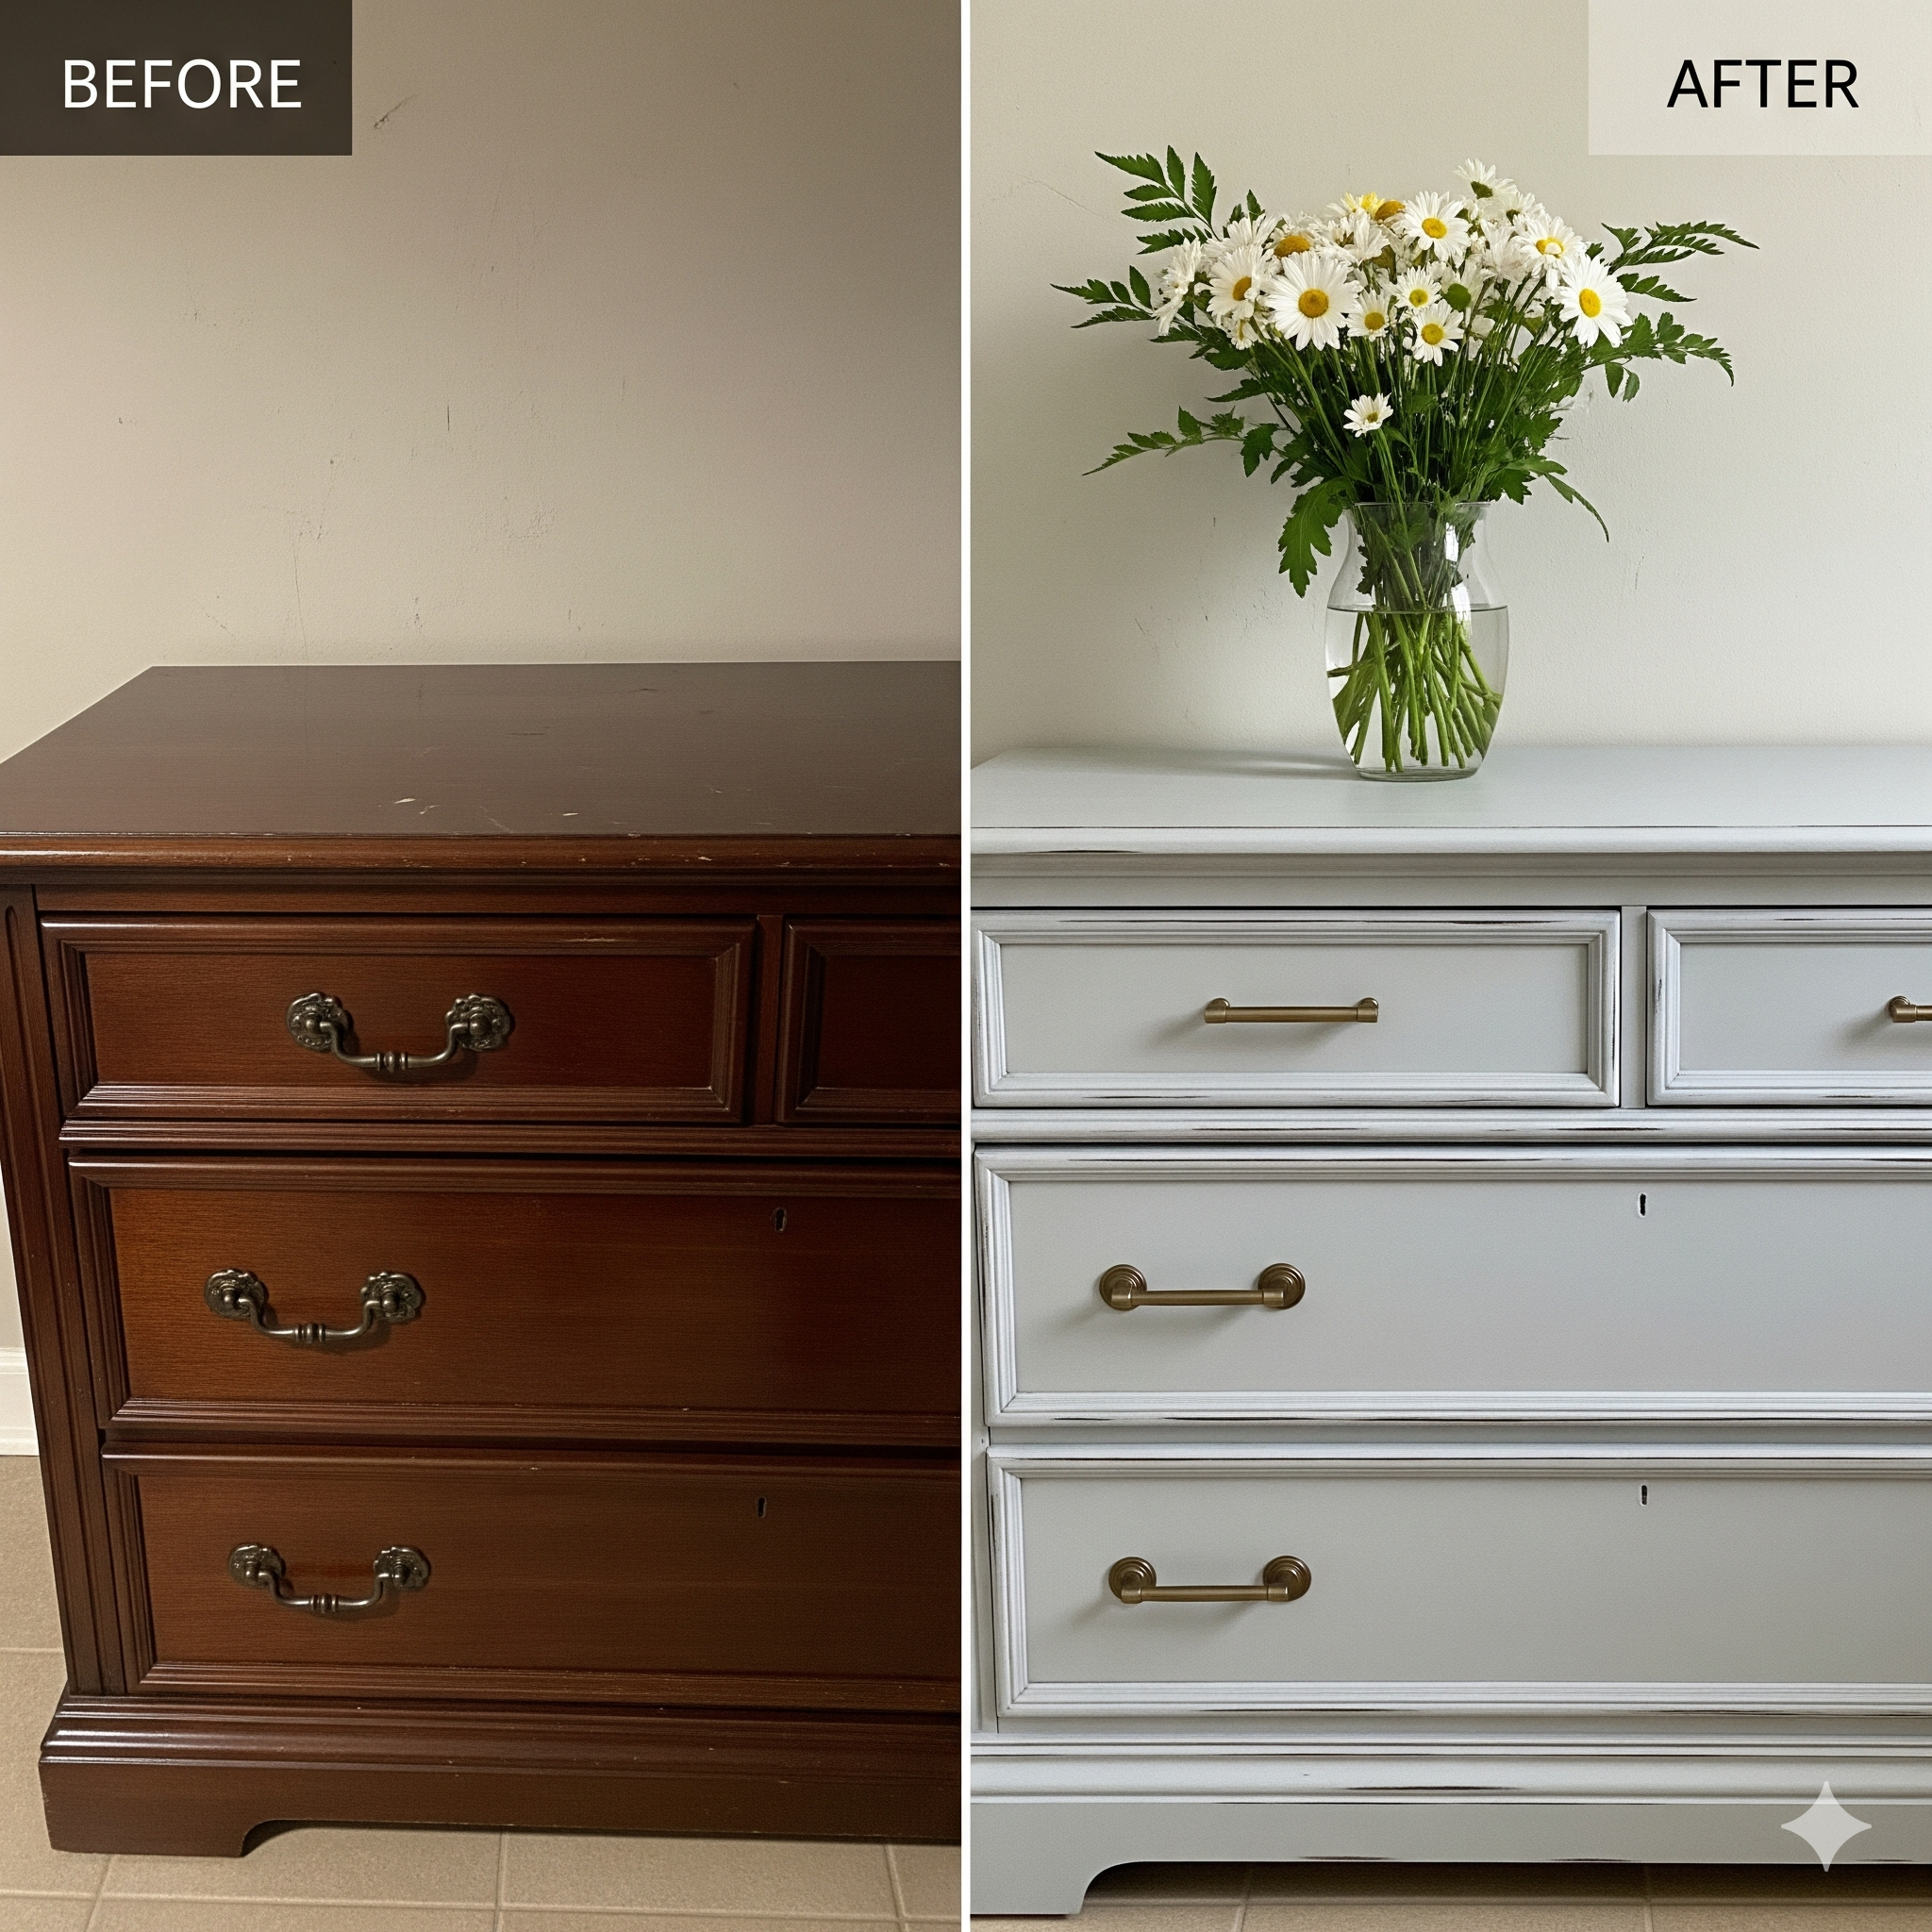
A True Kitchen Makeover on a Budget: Cost vs. Traditional Tile
The cost savings are staggering. A professional tile installation can cost thousands of dollars when you factor in the cost of the tiles, mortar, grout, sealant, and labor. A DIY traditional tile job still requires a significant investment in tools like a wet saw, trowels, and floats, not to mention the mess and steep learning curve. In contrast, a peel and stick backsplash project can typically be completed for between $50 and $200, depending on the size of your space and the quality of the tiles you choose. The only tools you really need are a tape measure, a level, and a utility knife. This affordability and accessibility make it the ultimate **kitchen makeover on a budget**.
How to Choose the Best Peel and Stick Backsplash for a Rental Apartment
Your final result is almost entirely dependent on the quality of the product you choose. Navigating the sea of options can be tricky. A cheap, poorly made tile can peel at the corners, look fake, and be difficult to install. A high-quality tile will have a strong adhesive, a realistic finish, and will be easy to work with. Having installed many of these in my time, I’ve learned to spot the difference. Here’s my personal checklist for choosing the **best peel and stick backsplash for a rental apartment** that you’ll be proud to display.
| Tile Material | Realism | Ease of Cutting | Best For |
|---|---|---|---|
| Vinyl / PVC | Good to Excellent | Easy (Utility Knife) | Most common; endless patterns and colors. |
| Gel (3D Epoxy) | Excellent | Easy (Utility Knife) | Mimicking the look of glossy glass or ceramic tile. |
| Metal | Excellent | Moderate (Tin Snips) | Modern, industrial look (stainless, copper). |
| Stone / Composite | The Most Realistic | Difficult (Saw Required) | High-end look, but less renter-friendly. |
Understanding Quality: What to Look For and Where to Buy
The number one indicator of quality is thickness and texture. Look for tiles that have a tangible, 3D texture, not just a flat, printed pattern. Reputable brands like Smart Tiles (the original gel-O tiles) or Aspect Peel & Stick Tiles are known for their quality. When shopping, always order a sample first! This allows you to see the color in your kitchen’s specific lighting and feel the quality and thickness for yourself. You can find great selections at big-box stores like The Home Depot, but I also recommend checking out online retailers like Wayfair or even Amazon for a wider variety of unique designs. Reading customer reviews and looking at user-submitted photos is an invaluable part of the selection process.
Pre-Installation Prep: The Most Important Step for a Perfect Finish
I cannot stress this enough: your final result is 90% dependent on your prep work. A clean, smooth, and properly prepared wall is the secret to a backsplash that sticks properly and looks professional. Rushing this stage will lead to peeling corners and visible imperfections. Taking an hour to do this right will save you a world of frustration. It is the most critical part of installing your **temporary backsplash**.
Step 1: Gathering Your Tools
The good news is, you don’t need much! This is what makes it such a great DIY project.
- A good quality utility knife or box cutter with plenty of sharp, new blades
- A metal ruler or straightedge
- A self-healing cutting mat
- A tape measure
- A level (a laser level is amazing, but a standard one works perfectly)
- A smoothing tool (a plastic wallpaper smoother or a credit card)
- A pencil
Step 2: Thoroughly Cleaning and Degreasing Your Walls
This is the most crucial step. Kitchen walls, especially behind the stove, are covered in a thin layer of grease, even if you can’t see it. The adhesive on your tiles will not stick to grease. You must use a degreasing cleaner. My go-to is a TSP (Trisodium Phosphate) substitute, which is a powerful cleaner you can find at any hardware store. Follow the instructions on the package, and scrub your walls thoroughly. Then, wipe them down again with a clean, damp cloth to remove any residue and let them dry completely—I recommend waiting at least 24 hours to be safe.
The Main Event: A Detailed, Step-by-Step Installation Guide
Alright, your walls are clean, your tools are ready, and you’ve got your beautiful tiles. It’s time for the magic to happen. Work slowly and methodically. This process is very forgiving, but a little patience goes a long way. The key is to get your first tile perfectly level, as every other tile will align with it. This is the hands-on part of your **kitchen makeover on a budget**.
Part 2: Applying the First Tile
Take a deep breath! This is the most important tile. Do not peel the entire backing off at once. Peel back just the top couple of inches and fold the backing paper down. Carefully align the top edge of your tile with your level guideline. Lightly press it into place. Double-check that it’s perfectly level. If it’s not, you can gently peel it off and readjust. Once you’re certain it’s straight, press the top portion firmly to the wall. Then, slowly pull the rest of the backing paper off from behind the tile, using your smoothing tool to press the tile to the wall as you go. Work from the center outwards to push out any air bubbles.
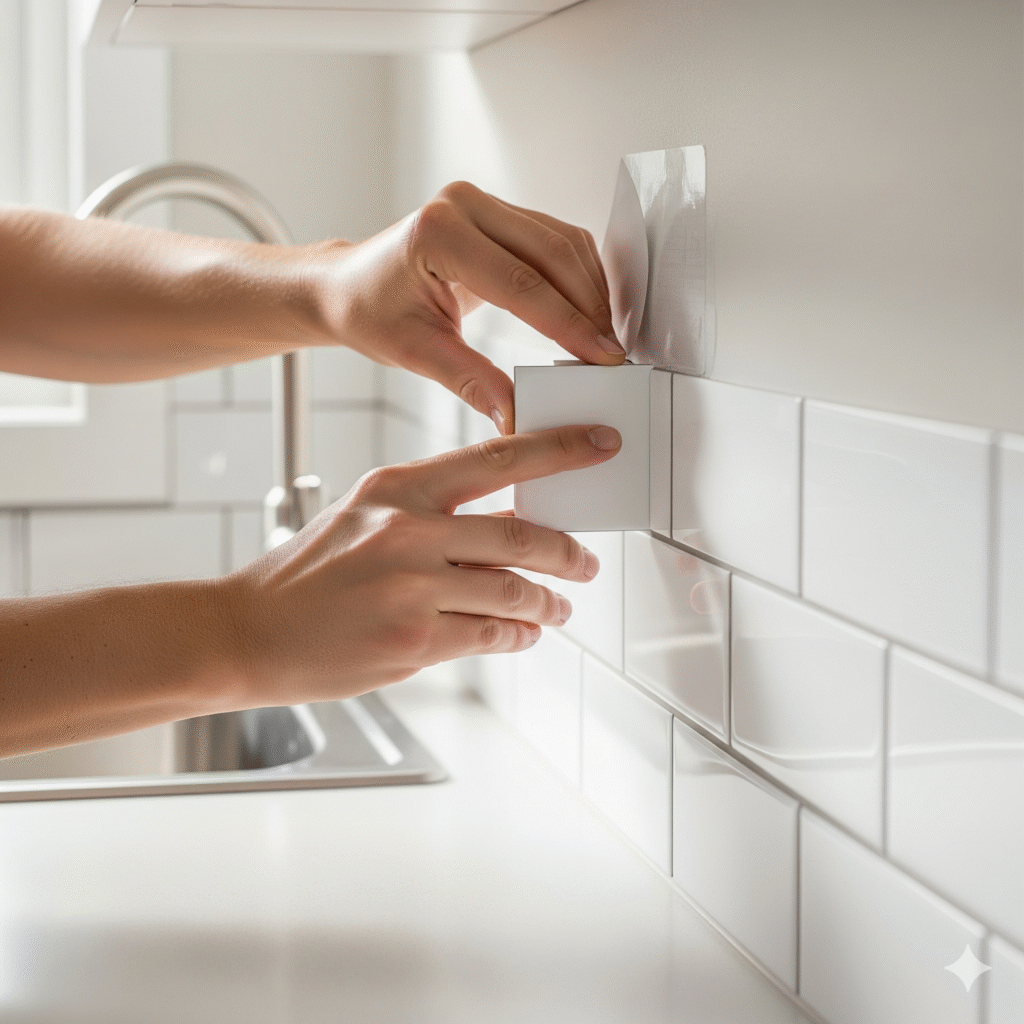
Part 4: Navigating Tricky Areas like Outlets and Corners
Outlets are the trickiest part, but they’re totally manageable. First, turn off the power to the outlets at your breaker box for safety! Remove the outlet cover plate. Hold your tile sheet up to the outlet and use a pencil to trace the outline of the electrical box directly onto the tile. Using your utility knife and cutting mat, carefully cut out the traced shape. It’s always better to cut the hole a little smaller at first; you can always trim more if needed. Fit the tile around the outlet, and then you can screw the cover plate back on right over the tile for a clean, professional finish. For a great visual guide on this, check out the tutorials on sites like This Old House.
Finishing Touches and Long-Term Care
You’ve done it! The tiles are up and your kitchen looks amazing. A few final touches can elevate the project even further and ensure it lasts for years to come. These final details are what separate a good DIY job from a great one.
The Removal Process: How to Take It Down Without Damaging Walls
When it’s time to move out, the removal process is simple. The secret is heat. Use a hairdryer to warm up the surface of the tiles. This will soften the adhesive. Start at a top corner and use a putty knife to gently lift the edge. Then, slowly and carefully pull the tile downwards, away from the wall, applying heat as you go. It should peel off cleanly. If any sticky residue is left behind, it can usually be removed with a gentle adhesive remover like Goo Gone, but be sure to test it on a small, inconspicuous spot first.
Installing a peel and stick backsplash is one of the most satisfying and transformative DIY projects you can do. It’s a quick, affordable, and commitment-free way to inject a huge amount of style and personality into a room that is truly the heart of the home. I hope this guide has given you the confidence to tackle your own kitchen makeover!
Frequently Asked Questions (FAQ)
Can I install a peel and stick backsplash over existing tiles?
Yes, in most cases you can! The key is that the existing surface must be flat and smooth. If your current tiles have deep, textured grout lines, you may need to fill them in with a thin layer of skim-coat plaster to create a smooth surface before applying the peel and stick tiles. Always make sure the existing tiles are thoroughly cleaned and degreased first.
Is it safe to put a peel and stick backsplash behind my stove?
Generally, yes, but you MUST check the manufacturer’s specifications. Most high-quality tiles are rated for the heat from a standard stove, but they usually require a clearance of about 6-8 inches from an open flame. If you have a gas stove with a back panel that gets very hot, some people opt to install a stainless steel panel directly behind the stove and then apply the peel and stick tiles on either side.
What if I make a mistake and a tile is crooked?
Don’t panic! Most peel and stick tiles have a repositionable adhesive, especially for the first few minutes. If you’ve just placed a tile and realize it’s crooked, you can usually gently peel it off the wall and re-apply it. The key is to do it immediately. Once the adhesive has had time to fully cure (usually after 24-48 hours), it will be much more difficult to remove.

Post Comment