How to Change a Light Fixture Safely by Yourself

Learn how to change a light fixture safely by yourself with our beginner-friendly guide. Understand basic home wiring and complete a DIY lighting upgrade.
Don’t Be Afraid of the Wires: A Step-by-Step Guide to Safely Replacing a Light Fixture
There are few DIY projects that offer as much bang for your buck as changing a light fixture. A new light can instantly update the style of a room, improve the quality of the light, and make a space feel brand new. Yet, for so many people, it’s the one project they’re terrified to tackle. As a tiny home builder and a hands-on renovator at Neat Tiny Home, I can tell you that the fear is almost always centered around one thing: the wires. The world of electrical work can seem mysterious and dangerous, but I’m here to demystify it for you. The truth is, with the right knowledge and an unwavering commitment to safety, changing a light fixture is a straightforward, satisfying, and completely achievable project for a beginner.
This is your complete, beginner-friendly, safety-obsessed guide on how to change a light fixture safely by yourself. We are going to walk through this process step-by-step, leaving no stone unturned. We’ll cover the essential safety protocols that are non-negotiable, the tools you’ll need, how to remove your old fixture, and how to understand the basic home wiring you’ll find in your ceiling. By the time you’re done reading, you’ll have the confidence and the know-how to complete this incredible DIY lighting upgrade. My goal isn’t just to show you how to do it, but to show you how to do it with the utmost confidence and safety, turning that fear of the unknown into a feeling of empowerment.
Demystifying DIY Electrical: Why This is a Project You CAN Do
Let’s start by getting on the same page. Working with electricity demands respect, not fear. The fear comes from a lack of understanding. By understanding the basic principles of how a simple lighting circuit works, you replace that fear with healthy respect and caution. A light fixture is one of the simplest circuits in your home. Power flows from your breaker box, through a switch, up to the light fixture, and back again. Our job is simply to interrupt that flow of power completely, disconnect the old device, and connect the new one in the exact same way. It’s like unplugging a lamp before you change the bulb, just with a few extra steps. When you follow the safety rules without deviation, the process is incredibly safe. This guide is designed to give you those rules and the knowledge to understand why they are so important for learning how to change a light fixture safely by yourself.
The Golden Rule of Electrical Work: SAFETY FIRST
I’m going to repeat this concept again and again throughout this guide. There is no shortcut, no “it’s probably fine,” no “I’ll just be quick.” Your safety, and the safety of your home, is the only thing that matters. The single most important rule is to ensure the power to the circuit you are working on is completely, 100%, verifiably off. Not just at the light switch on the wall, but at the main circuit breaker panel for your entire home. This is the golden rule that makes this entire DIY project possible for a homeowner. For more information on home electrical safety, I always recommend resources from the Electrical Safety Foundation International (ESFI), which is a fantastic non-profit resource.
When NOT to DIY: Knowing Your Limits
While changing a fixture is a great beginner project, there are red flags that mean you should stop immediately and call a licensed electrician.
- If you see any signs of scorching, melting, or frayed wires in the electrical box.
- If you discover your home has old aluminum wiring (common in homes built from the mid-60s to early 70s), which requires special handling.
- If you turn off the breaker but a voltage tester still indicates that the circuit is live.
- If the project involves running a new wire to a place where there was no light before.
Phase 1: Preparation and Safety Protocol
A successful and safe installation is all about preparation. Rushing into the project is how mistakes happen. By taking 30 minutes to gather your tools, understand your new fixture, and meticulously follow the safety protocol, you set yourself up for a smooth and stress-free process. This is the professional way to approach any home maintenance task, and it’s an absolutely essential part of learning how to change a light fixture safely by yourself.
| Tool | Purpose | Pro-Tip |
|---|---|---|
| Non-Contact Voltage Tester | To verify 100% that the power is off. | This is the most important safety tool you will buy. It’s non-negotiable. |
| Screwdrivers | To remove the old fixture and install the new one. | Have both a Phillips head and a flathead on hand. |
| Wire Strippers/Cutters | To cut and strip the ends of the wires if needed. | Many have a built-in wire stripper gauged for common wire sizes. |
| Wire Nuts | To connect the wires safely. | Your new fixture will come with them, but it’s good to have extras. |
| Sturdy Ladder or Step Stool | To safely reach the ceiling. | Ensure it’s on a flat, stable surface. Never over-reach. |
CRITICAL STEP: Turning Off the Power (and Verifying It)
This is it. This is the step that guarantees your safety.
- Turn on the light fixture you are about to replace. This is important.
- Go to your home’s main electrical panel (breaker box). Find the breaker that controls the light. It might be labeled “Living Room Lights” or “Bedroom.” If the breakers aren’t labeled, you’ll need a helper. Flip breakers one by one until the light you left on in the room turns off.
- Leave that breaker in the OFF position. I highly recommend putting a piece of tape over it with a note that says “DO NOT TOUCH – WORKING” to prevent anyone from accidentally flipping it back on.
- Go back to the light switch on the wall and flip it a few times. Confirm the light does not turn on.
- THIS IS THE MOST IMPORTANT PART: Take your non-contact voltage tester and hold its tip near the light switch and then up near the light fixture itself. The tester should not beep or light up. Only when the voltage tester confirms there is NO electrical current are you safe to proceed. If it beeps, something is wrong. Stop and call an electrician.
This multi-step verification process is the professional standard for how to change a light fixture safely by yourself.
Phase 2: Removing the Old Light Fixture
With the power verifiably off, you can now begin the easy part: taking down the old fixture. This process is straightforward. Work slowly and take a picture with your phone at every stage. This will create a visual guide you can refer back to if you get confused later. Having a helper to hold the fixture while you disconnect the wires can also be very useful, but it’s not required.
Step-by-Step Removal Process:
- Remove Covers and Bulbs: Start by removing any glass shades, covers, or light bulbs from the old fixture. This will make it lighter and less fragile to handle.
- Unscrew the Fixture Base: Look for decorative nuts or screws that hold the main body of the fixture to the ceiling. Loosen these. The fixture will drop down slightly, but it will still be hanging by the wires. Do not let it hang by the wires alone; support its weight with one hand.
- Photograph the Wiring: This is a crucial step! Before you disconnect anything, pull the fixture down a few inches so you can clearly see the wiring. You should see the wires from the ceiling connected to the wires from the fixture with wire nuts. Take a clear photo with your phone. This is your roadmap for connecting the new fixture.
- Disconnect the Wires: Unscrew the plastic wire nuts by twisting them counter-clockwise. The wires should separate easily. Once all wires are disconnected, the old fixture will be free, and you can set it aside.
Phase 3: Understanding Basic Home Wiring (The Colors Explained)
Now that the wires are exposed, let’s have a quick lesson in basic home wiring. In most modern homes, you’ll see three types of wires. Understanding what each one does is key to a safe installation. Reputable home improvement sites like The Spruce have excellent guides on this topic.
- The Black Wire (“Hot”): This wire carries the live electrical current from the breaker panel to your fixture. It is the “power” wire.
- The White Wire (“Neutral”): This wire completes the circuit by carrying the current back to the breaker panel. It’s essential for the flow of electricity.
- The Copper or Green Wire (“Ground”): This is a safety wire. Its job is to provide a path for electricity to flow to the ground in case of a short circuit, which helps prevent electrical shock.
The fundamental rule of wiring is simple: you will connect the wires of your new fixture to the corresponding wires from the ceiling—black connects to black, white connects to white, and ground connects to ground. It’s as simple as matching the colors.
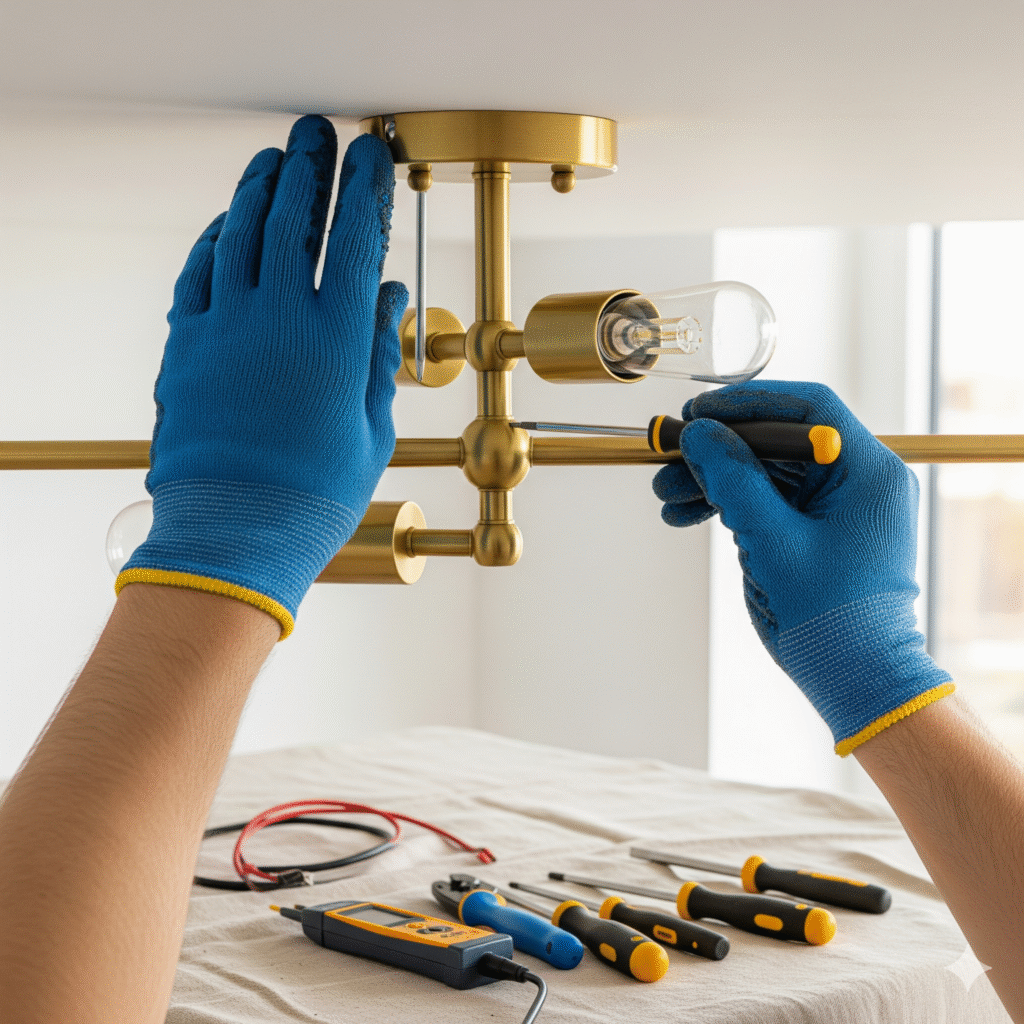
Phase 4: Installing the New Light Fixture
You’re on the home stretch! Installing the new fixture is essentially the reverse of the removal process. Your new fixture will have come with a new mounting bracket, new screws, and new wire nuts. It’s always best practice to use the new hardware provided.
Step-by-Step Installation:
- Install the New Mounting Bracket: Unscrew the old mounting bracket from the electrical box in the ceiling. Screw the new one in its place. The new bracket will have a pre-installed green ground screw.
- Connect the Wires: Have a helper hold the new fixture or use the ladder to support it. Connect the ground wire first: wrap the bare copper wire from the ceiling around the green ground screw on the bracket, and then connect it to the ground wire from your new fixture using a wire nut. Next, connect the two white (neutral) wires together with a wire nut. Finally, connect the two black (hot) wires together with a wire nut.
- Secure the Wire Nuts: Twist the wire nuts on clockwise until they are very snug. A good connection is firm. Give each wire a gentle tug to make sure it is secure inside the nut. The connection should be tight, with no bare copper showing below the edge of the nut.
- Attach the New Fixture: Gently push all the wiring back up into the electrical box. Align the new fixture with the mounting screws on the bracket and secure it in place with the provided decorative nuts or screws. Install your light bulbs, and you’re ready for the final phase!
This methodical approach is the safest way to tackle your first DIY lighting upgrade.
Phase 5: The Moment of Truth and Troubleshooting
The final phase is restoring power and testing your work. But before you do, one last safety check is in order. Double-check that all wire nuts are tight and that no bare wires are exposed. Ensure the fixture is securely mounted to the ceiling.
Step-by-Step Power-Up:
- Make sure the wall switch for the light is in the OFF position.
- Go to your breaker box and flip the breaker back to the ON position. Remove your tape.
- Go to the light switch, take a deep breath, and flip it on.
If the light turns on, congratulations! You have successfully and safely changed your own light fixture. If it doesn’t, don’t panic. Go back and turn the breaker off immediately and check the troubleshooting tips in the FAQ. Knowing how to change a light fixture safely by yourself also means knowing how to troubleshoot safely.
Frequently Asked Questions (FAQ)
What do I do if my house is old and there’s no ground wire in the ceiling box?
This is common in older homes. While not ideal, you can still install most modern fixtures. The fixture’s ground wire (copper or green) won’t have a corresponding wire from the ceiling to connect to. In this case, you should securely connect the fixture’s ground wire to the metal electrical box itself, using the green ground screw on the mounting bracket. If the box is plastic, you will simply cap off the fixture’s ground wire with a wire nut and leave it unattached. The fixture will still function, but it will not have that extra layer of grounding protection. For more info, consult a resource like This Old House.
The light doesn’t turn on. What did I do wrong?
First, turn the power off at the breaker again! The most common culprits are: 1) A loose connection in one of the wire nuts. Take them off and reconnect them, ensuring they are very tight. 2) The light bulb itself is faulty or not screwed in all the way. Try a different bulb. 3) The tabs inside the light bulb socket are flattened. With the power off, you can gently use a popsicle stick to bend the small metal tab at the bottom of the socket up slightly to ensure it makes contact with the bulb.
The breaker tripped as soon as I turned the light on. What does that mean?
Turn the breaker back off immediately. This almost always indicates a short circuit, meaning your hot (black) wire is touching either the neutral (white) or ground (copper) wire somewhere. Carefully take the fixture down and inspect your connections. Make sure there are no stray strands of copper from the black wire touching any other part of the fixture or the other wires. Ensure the wire nuts are on securely and no bare wire is exposed.
Post Comment