DIY Murphy Bed Kit for a Tiny House Guide
Our step-by-step guide shows you how to use a DIY murphy bed kit for a tiny house to build the ultimate space-saving bed. Includes plans and ideas.
Build the Ultimate Space-Saver: A Step-by-Step Guide to a DIY Murphy Bed
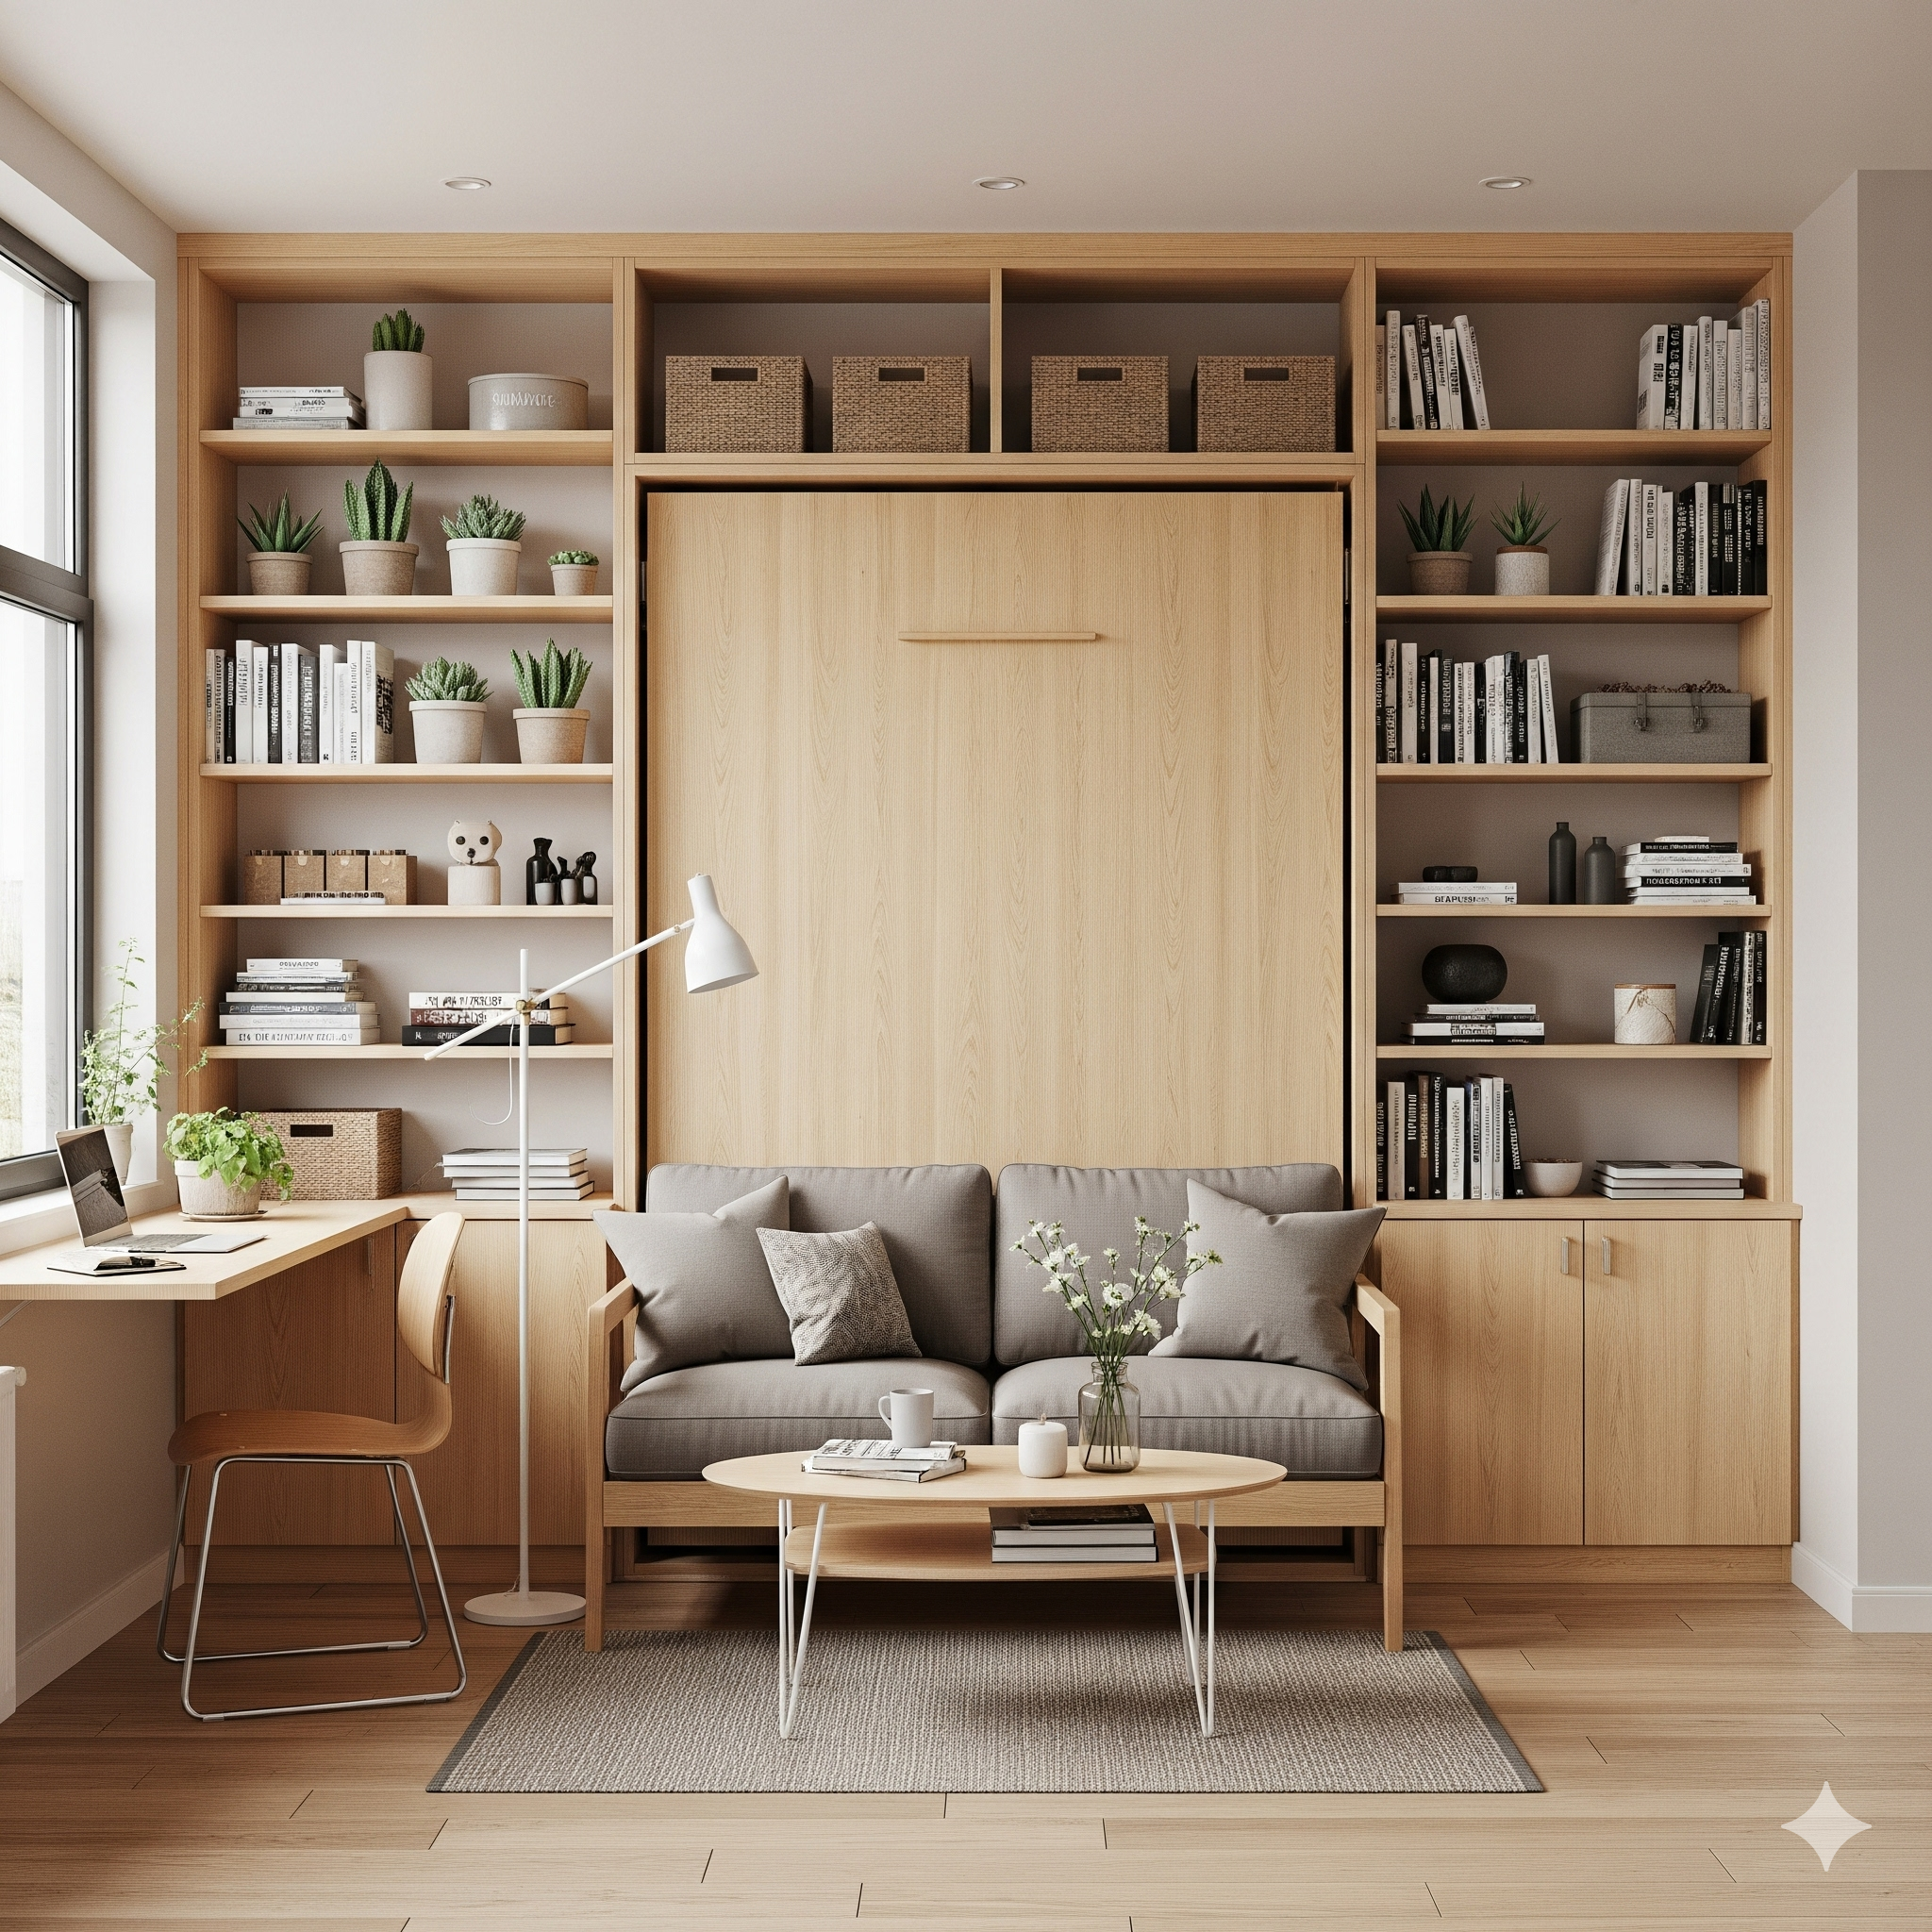
In the world of tiny living, every square foot is a battleground. As the founder of Neat Tiny Home and a dedicated builder of small spaces, I’ve learned that the most brilliant tiny home designs are those that embrace transformation. A room shouldn’t have just one purpose; it should have many. And there is no single piece of furniture that embodies this philosophy more powerfully than the Murphy bed. It’s the ultimate space-saving superhero, allowing you to have a luxurious, comfortable bed at night and a wide-open, functional living space, office, or yoga studio during the day. It’s the magic trick that gives you back an entire room’s worth of floor space.
While a professionally installed Murphy bed can cost thousands of dollars, building one yourself is a completely achievable and incredibly rewarding woodworking project. The secret to making this complex project accessible for a DIYer is to start with a high-quality hardware kit. This guide is my comprehensive, step-by-step masterclass on how to use a DIY murphy bed kit for a tiny house to build a custom, beautiful, and, most importantly, safe wall bed. We will walk through every phase, from choosing the right mechanism and designing your cabinetry to the critical steps of assembly and secure installation. We’ll also look at different wall bed plans and other space saving bed ideas. This is a big project, but I’m going to break it down into manageable steps to give you the confidence to build the ultimate piece of transforming furniture for your home.
The Murphy Bed: The Ultimate Space-Saving Solution for Tiny Homes
Before we dive into the sawdust and schematics, let’s fully appreciate why the Murphy bed is such a revered icon in the tiny house community. Its genius lies in its dual nature. Unlike a sleeper sofa, which often involves uncomfortable mattresses and cumbersome cushions, a Murphy bed allows you to have a real, high-quality mattress. You get the comfort of a conventional bed without the permanent sacrifice of floor space. For a tiny house that might only be 200-400 square feet, this is revolutionary. It means your bedroom doesn’t have to be just a bedroom. It can be your living room, your dining room, and your office. This ability to reclaim your largest living area every single morning is the primary reason why a Murphy bed is often the centerpiece of the most successful and livable tiny home designs.
The Critical Importance of Safety and Proper Installation
I’m going to say this upfront, and I’ll repeat it again later: this is a project where safety is paramount. A Murphy bed is a large, heavy piece of furniture that is under constant tension from a powerful lifting mechanism. A poorly built or improperly installed bed can be extremely dangerous. This is not a project where you can cut corners. You must follow the instructions from your hardware kit to the letter. The most critical step in the entire process is securely anchoring the bed’s cabinet to the structural framing of your tiny house walls. This is non-negotiable. This guide is written with a safety-first mindset to ensure your finished project is not only beautiful but also perfectly safe and reliable for daily use. When you use a high-quality DIY murphy bed kit for a tiny house and follow the instructions, you can build a bed that is just as safe as any professional model.
Is a Murphy Bed Right for Your Tiny House? Pros and Cons
A Murphy bed is a brilliant solution, but it’s not the right choice for everyone. It’s important to weigh the pros and cons for your specific lifestyle.
- Pros: Unmatched space-saving, allows for a real mattress, enables multi-functional rooms, adds a “wow” factor to your design.
- Cons: Requires daily effort to put up and down, a complex and precise DIY project, requires significant wall space, can be expensive even as a DIY project.
The Heart of the Project: Choosing a DIY Murphy Bed Kit for a Tiny House
The single most important decision you will make is choosing your hardware kit. The kit contains the lifting mechanism—the pistons or springs that do the heavy lifting—along with all the pivot hardware and instructions. The cabinetry you build is essentially just a box to house this mechanism. Attempting to engineer your own lifting system is extremely dangerous and not recommended. A good DIY murphy bed kit for a tiny house is the key to a safe and functional build. There are two primary types of mechanisms, and understanding their differences will help you choose the right one for your project.
| Mechanism Type | Ease of Installation | Adjustability | Best For |
|---|---|---|---|
| Spring Lift Mechanism | More complex | Highly adjustable for mattress weight | Heavy-duty, daily use; achieving perfect balance. |
| Piston Lift Mechanism | Easier for beginners | Less adjustable (pistons are rated for a weight range) | Simpler DIY builds; predictable lift. |
Top-Rated Kits on the Market
There are many reputable companies that sell high-quality hardware kits directly to consumers. These kits come with detailed instructions and often include video tutorials, making them perfect for a DIYer. Some of the most popular and well-regarded options include:
- The Create-A-Bed Kit: This is a very popular piston-based kit that is known for its straightforward instructions and reliability. It’s an excellent choice for first-time builders.
- Rockler Murphy Bed Hardware Kits: Rockler is a trusted name in woodworking, and they offer both spring and piston lift kits. Their kits are robust and come with excellent support.
- The Easy DIY Murphy Bed Kit: This is another highly-rated piston kit that focuses on simplicity and ease of installation, making it a great choice for a DIY murphy bed kit for a tiny house.
Phase 1: Planning, Designing, and Measuring Your Custom Cabinetry
Once you’ve selected your hardware kit, it’s time to design the “furniture” part of the project. Your kit’s instructions will provide the critical interior dimensions for the bed box and cabinet carcass. Your job is to build those boxes and decide what the exterior will look like. Will it be a simple, plain cabinet? Or will you integrate it into a larger wall unit with bookshelves and storage? This is where you can get creative and tailor the project to your specific needs and style.
Choosing Your Materials: Plywood vs. MDF
The most common and recommended material for building a Murphy bed is a high-quality, 3/4-inch hardwood plywood, such as birch or oak. Plywood is incredibly strong, relatively lightweight compared to solid wood, and holds screws very well, which is critical for the hardware. MDF (Medium-Density Fiberboard) is another option. It is cheaper, heavier, and has a very smooth surface that is perfect for painting. However, it does not hold screws as well as plywood and is more susceptible to water damage. For the structural components of a Murphy bed in a tiny house, which may experience temperature and humidity swings, I strongly recommend using plywood. For great guides on the properties of different woods, you can check out resources like The Wood Database.
Phase 2: Building the Bed Box and Cabinet Carcass
This is where the woodworking begins. The process involves cutting your large sheets of plywood down to the sizes specified in your kit’s instructions and then assembling the two main components: the outer cabinet (carcass) that mounts to the wall, and the inner box that holds the mattress and pivots up and down. Precision is key here. Inaccurate cuts can lead to a bed that doesn’t operate smoothly or close properly.
The Art of the Pocket Hole: A Beginner’s Guide to Strong Joints
For assembling your boxes, the strongest and most beginner-friendly method is using pocket hole joinery. A pocket hole jig, like the popular ones from Kreg Tool, allows you to drill angled holes on the inside of your pieces. You then drive self-tapping screws through these holes to join your pieces together. This creates an incredibly strong, stable joint without needing complex joinery skills. It’s the perfect method for building the cabinet and bed box for your DIY murphy bed kit for a tiny house.
Phase 3: Installing the Hardware and Assembling the Bed
This is the most technically demanding and safety-critical phase of the project. Read your kit’s instruction manual three times before you begin. The steps must be followed in the exact order specified. This is where you will install the powerful lifting mechanism that makes the bed work. Work slowly, methodically, and ideally, with a helper.
CRITICAL STEP: Mounting the Cabinet Securely to the Wall
I cannot overstate this. The cabinet carcass MUST be securely anchored to the studs in your wall. The lifting mechanism exerts a tremendous amount of force, and if the cabinet is not properly secured, it could pull away from the wall and cause a catastrophic failure. Use a stud finder to locate at least three or four studs behind your cabinet. Use heavy-duty lag screws (specified in your kit) to bolt the cabinet directly into these studs at the top, middle, and bottom. Do not rely on drywall anchors. If you are unsure about this step, consult a professional. For more on finding studs in unconventional tiny house walls, consulting tiny house building resources like The Tiny House is a great idea.
Beyond the Build: Wall Bed Plans and Space-Saving Bed Ideas
While building from a kit is the most recommended path, you can also find a wide variety of wall bed plans online if you are a more advanced woodworker. Sites like Ana White offer free plans for beautiful furniture, including various styles of Murphy beds. Beyond the traditional Murphy bed, there are many other fantastic space saving bed ideas to consider for a tiny house. Loft beds are a classic choice, freeing up the entire footprint underneath for a desk or seating area. Trundle beds are great for guests, and custom-built sofa systems with hidden beds can be a perfect all-in-one solution.
Building a Murphy bed is a challenging but immensely gratifying project. It is the ultimate piece of tiny house furniture, a testament to smart design and multifunctional living. By taking your time and prioritizing safety, you can build a feature that will serve you beautifully for years to come.
Frequently Asked Questions (FAQ)
What kind of mattress can I use in a Murphy bed?
Most Murphy bed kits are designed to be used with a standard innerspring or memory foam mattress, but there are two critical constraints: weight and thickness. The lifting mechanism is balanced for a specific weight range, so you must choose a mattress that falls within that range. The thickness is also limited by the depth of your cabinet, typically to 12 inches or less. Most kits will provide clear specifications for the mattress.
Do I have to make the bed every day before closing it?
No, that’s one of the beauties of a Murphy bed! The kits come with straps that buckle over your mattress and bedding (sheets, comforter, and pillows) to hold everything in place when the bed is in the vertical position. You simply buckle the straps and fold the bed away, fully made.
Is building a Murphy bed really cheaper than buying one?
Yes, significantly. A pre-made, professionally installed Murphy bed can easily cost $3,000 to $7,000 or more. A high-quality hardware kit costs around $300-$600, and the wood and finishing supplies might cost another $400-$800, depending on your material choices. By doing the work yourself, you can get a custom, high-quality bed for under $1,500, saving you thousands of dollars.

Post Comment