How to Build Simple Floating Shelves for Books

Learn how to build simple floating shelves for books with our step-by-step DIY guide. Includes ideas for industrial pipe and rustic wood shelves.
From Blank Wall to Beautiful Display: A DIY Guide to Floating, Industrial, and Rustic Shelves
There is no more versatile or impactful addition to a room than a set of shelves. They are the ultimate multitaskers of the decor world—they provide critical storage, create a stage for your personality, and can even act as a piece of architectural art. As someone who lives and breathes small-space design at Neat Tiny Home, I can tell you that getting your storage up off the floor and onto the walls is the single most effective way to make a room feel larger. And while you can certainly buy shelves, there is a special kind of pride and unparalleled level of customization that comes from building them yourself. A DIY shelving project allows you to create a solution that is the perfect size, the perfect color, and the perfect style for your unique space, often for a fraction of the cost of a store-bought unit.
This is your ultimate, hands-on guide to the world of DIY shelving. We are going to go deep into the most sought-after style, with a comprehensive, step-by-step tutorial on how to build simple floating shelves for books that are strong, sleek, and truly appear to float on the wall. But we won’t stop there. We’ll also build a rugged and stylish industrial pipe shelving DIY unit and explore how to create charming, character-filled rustic wood shelves. This guide is designed for all skill levels, from the nervous beginner to the seasoned DIYer. My goal is to demystify the process, give you the confidence to pick up some tools, and empower you to transform a blank wall into a beautiful and functional focal point in your home.
The Enduring Appeal of DIY Shelves: Why Build When You Can Buy?
In a world of fast furniture, you might wonder why you should bother building your own shelves. The answer is simple: control. When you DIY, you are in complete control of the materials, the dimensions, and the final finish. This is especially critical in tiny homes or apartments with awkward nooks and non-standard wall sizes. A custom-built shelf can fit into a space with millimeter precision, creating a high-end, built-in look that no store-bought unit could ever achieve. Beyond the perfect fit, there’s a tangible connection to a piece you’ve built yourself. It’s more than just a shelf; it’s a story, a weekend project, and a source of lasting pride every time you look at it. This is the true reward of learning how to build simple floating shelves for books and other decor.
Quality on a Budget: Getting a High-End Look for Less
Let’s talk about value. High-quality, solid wood shelving can be incredibly expensive. By building your own, you can use premium materials like solid oak, walnut, or thick butcher block for the cost of what you might pay for a particleboard shelf from a big-box store. You have the power to choose beautiful, durable materials and professional-grade hardware. A set of custom-built industrial pipe shelves, for example, can cost hundreds of dollars to buy pre-made. Sourcing the pipes and wood yourself, which you can do from a hardware store like Lowe’s or a specialty supplier, can cut that cost by more than half while giving you a stronger, more authentic result. DIY is the ultimate secret to achieving a luxury look on a real-world budget.
Essential Tools for Your DIY Shelving Journey
While each project has its specific needs, a basic set of tools will see you through most DIY shelving projects. Investing in a few quality basics will pay dividends for years to come.
- A good quality drill and drill bits: This is your most important tool. A cordless drill is essential for modern DIY.
- A level: A 24-inch or 48-inch level is crucial for ensuring your shelves aren’t crooked.
- A stud finder: Non-negotiable for securely mounting anything to a wall.
- A measuring tape and a pencil: The foundation of all good projects.
- A saw: A simple hand saw and miter box can work for basic cuts, but a circular saw or miter saw will make your life much easier and your cuts more precise.
- Safety gear: Always have safety glasses and gloves on hand.
| DIY Shelf Type | Skill Level | Typical Cost | Best For |
|---|---|---|---|
| “True” Floating Shelf | Intermediate | $30 – $70 | A sleek, minimalist look for books and decor. |
| Industrial Pipe Shelf | Beginner | $50 – $150 | A rugged, urban style with high weight capacity. |
| Rustic Shelf with Brackets | Beginner | $25 – $60 | A charming, farmhouse look; very easy to install. |
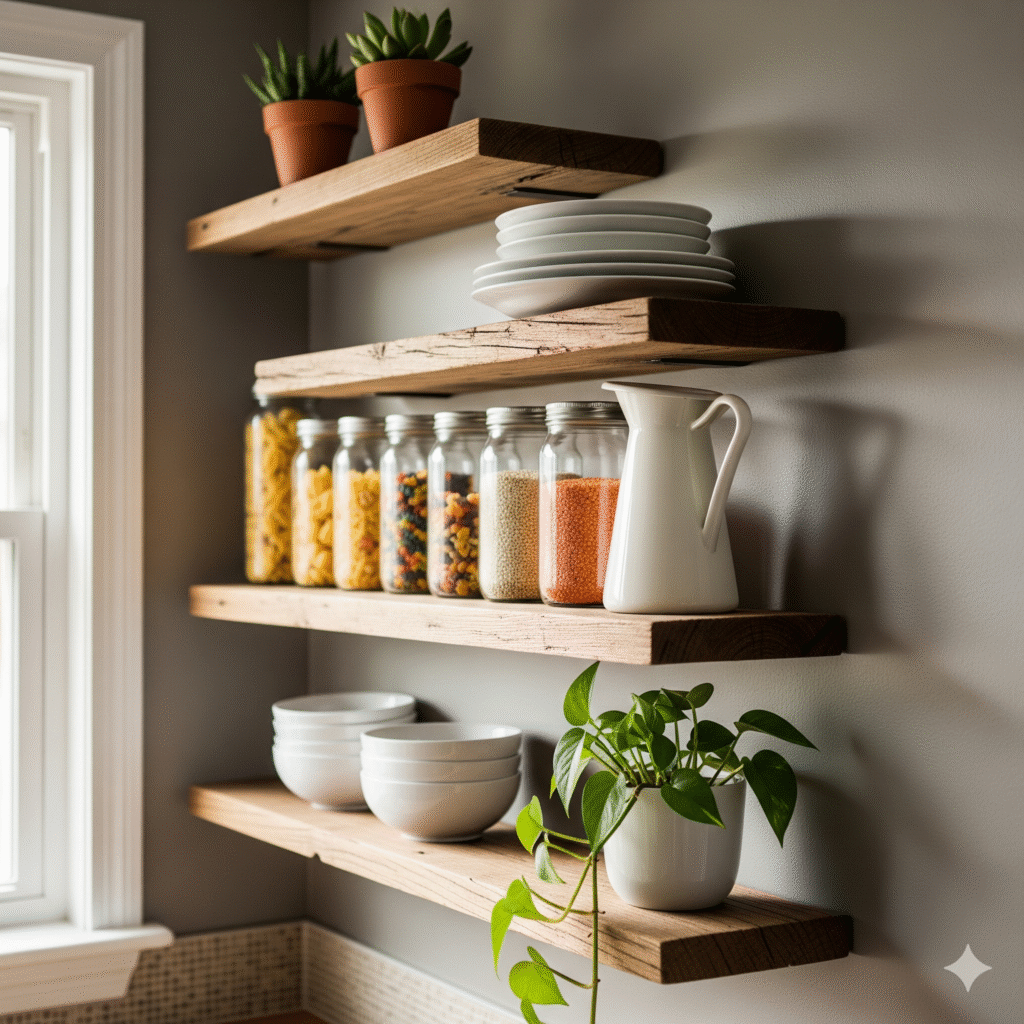
The Main Event: How to Build Simple Floating Shelves for Books (The “Truly Floating” Method)
This is the gold standard of floating shelves. This method uses a hidden internal bracket, or wall cleat, to create a shelf that is incredibly strong (strong enough for books!) and appears to magically emerge from the wall with no visible means of support. It’s a bit more involved than other methods, but the sleek, professional result is absolutely worth the effort. This comprehensive tutorial will show you exactly how to build simple floating shelves for books that will become a centerpiece of your room. The secret lies in building a hollow, lightweight box, known as a torsion box, that slides over a sturdy cleat mounted to the wall.
Part 1: Building the Torsion Box (The Hollow Shelf)
A solid slab of wood thick enough to be a floating shelf would be incredibly heavy. By building a hollow box, we create a shelf that is lightweight but, due to its internal structure, remarkably strong and resistant to sagging.
Materials and Cut List:
- One 1×4 board for the internal frame (the length depends on your desired shelf length)
- Two pieces of 1/4-inch plywood for the top and bottom “skins” of the shelf
- One piece of 1×2 board for the front face of the shelf
- Wood glue and 1.25-inch brad nails or screws
Step-by-Step Assembly:
- Build the Frame: Cut your 1×4 boards to create a ladder-like frame. You will have two long side pieces and several shorter “rungs” that will run between them, spaced about 8-10 inches apart. Assemble this frame using wood glue and screws.
- Attach the Skins: Apply a generous amount of wood glue to one side of the frame. Carefully place your top piece of 1/4-inch plywood onto the frame and secure it with brad nails every few inches. Flip the frame over and repeat for the bottom skin.
- Add the Face Frame: Glue and nail the 1×2 board to the front of your hollow box. This hides the raw edges of the plywood and gives the shelf a solid, chunky look.
You have now built the “sleeve” of your floating shelf. For a great visual guide to building a torsion box, you can find many detailed tutorials from woodworking experts like Steve Ramsey on YouTube.
Part 2: Creating and Mounting the Wall Cleat
The wall cleat is the hidden hero of this operation. It’s a simple wooden bracket that you will mount securely to the wall studs, and it’s what your hollow shelf will slide onto.
Step-by-Step Mounting:
- Build the Cleat: The cleat is essentially a wooden finger that is slightly smaller than the inside of your hollow shelf. It’s typically made from a 2×3 or 2×4 board. It must fit snugly inside the shelf box.
- Find Your Studs: This is the most critical step for safety and strength. Use your stud finder to locate and mark the center of every wall stud where your shelf will hang.
- Mount the Cleat: Use a level to ensure your cleat is perfectly straight. Then, using long, heavy-duty lag screws (at least 3 inches long), mount the cleat securely to the wall, driving the screws directly into the center of the studs. This cleat should be incredibly solid and able to hold your body weight.
Part 3: Finishing and Installation
With the hard parts done, it’s time for the finishing touches.
- Sand and Finish: Fill all nail holes on your shelf box with wood filler and sand the entire shelf smooth, working your way up to a fine-grit sandpaper (220-grit). Wipe it clean and then apply your desired finish—paint, or a stain and polyurethane combination. I’m a fan of Varathane products for their durability.
- Install the Shelf: Once everything is dry, the final step is magical. Simply slide your hollow shelf box over the wall cleat. It should be a snug fit. For added security, drive a few screws from the top of the shelf down into the cleat to lock it in place.
Stand back and admire your work. You’ve just learned the professional method for how to build simple floating shelves for books.
Idea 2: Industrial Pipe Shelving DIY (A Rugged, Urban Look)
For a completely different vibe, this industrial pipe shelving DIY project is a fantastic choice. It’s rugged, has an incredible weight capacity, and is surprisingly easy to assemble—it’s like working with an adult erector set! The key is planning your design and sourcing the right parts.
Sourcing Your Pipes and Fittings:
You can find all the necessary black iron or galvanized pipes and fittings at a big-box hardware store. The most common sizes are 1/2-inch or 3/4-inch diameter. You will need:
- Pipes (cut and threaded to your desired lengths in-store)
- Floor Flanges (to attach to the wall)
- Elbows, Tees, and Caps (to create your design)
- Wood for your shelves (a thick construction-grade pine or fir works beautifully)
Step-by-Step Tutorial:
- Clean and Seal the Pipes: The black iron pipes often have a greasy residue. Clean them thoroughly with a degreaser, then apply a few coats of a clear matte spray sealer to prevent rust and keep them clean to the touch.
- Assemble the Pipe Structure: Hand-tighten all your pipe pieces together on the floor to build your bracket structure. Don’t worry if it’s not perfectly rigid yet.
- Mount to the Wall: Hold your assembled structure against the wall, use a level to get it perfectly straight, and mark the holes for your floor flanges. Again, be sure to anchor these directly into wall studs.
- Prepare and Place Shelves: Sand and stain your wood shelves. Once dry, simply place them onto the assembled pipe structure. The weight of the shelves and your items will hold them securely in place.
This project is one of the most forgiving and results in a seriously cool piece of custom furniture. It’s a perfect example of a high-impact, industrial pipe shelving DIY project.
Idea 3: Easy & Charming Rustic Wood Shelves
For a warm, cozy, and character-filled look, you can’t beat simple rustic wood shelves. This style celebrates the natural beauty and imperfections of wood. It’s less about precision and more about texture and charm. This is arguably the easiest and most budget-friendly of all the DIY shelving options.
Sourcing and Preparing Your Wood:
The star of the show is the wood. Look for a thick piece of wood with a lot of character. You can buy a standard piece of construction lumber (like a 2×8 or 2×10) from a hardware store and distress it yourself by hitting it with a chain or hammering it gently. Or, for true authenticity, look for reclaimed wood from a local salvage yard. Once you have your wood, give it a good sanding to smooth out any splinters, but don’t try to make it look perfect. Apply a dark wax or a simple wood stain to enhance the grain and give it an aged look. For great ideas on different wood finishing techniques, check out the guides on woodworking blogs like Shanty2Chic.
Choosing Hardware and Installing:
The hardware is key to the rustic look. Look for heavy, decorative cast-iron brackets or simple wooden corbels. There are thousands of beautiful, vintage-inspired options available on sites like Etsy. The installation is simple: mount your brackets to the wall, making sure they are level and secured into studs, and then place and secure your finished wood shelf on top. It’s a quick project that adds an immense amount of warmth and character to any room.
No matter which style you choose, your new DIY shelves are a blank canvas. Styling them is your opportunity to display your personality and turn your storage into a beautiful, curated collection. Have fun with the process and enjoy the incredible satisfaction of building something beautiful and functional for your own home.
Frequently Asked Questions (FAQ)
How do I make sure my shelves are strong enough to hold heavy books?
The strength of any shelf comes from its connection to the wall. The absolute most important rule is to anchor your brackets or cleats directly into the wall studs. Drywall anchors alone are not sufficient for heavy loads. For very heavy-duty needs, use more brackets, spaced closer together (e.g., one bracket into every stud), and choose thick, solid wood for the shelf itself.
What’s the best way to cut the wood for my shelves if I don’t own a saw?
Most major hardware stores like The Home Depot or Lowe’s have a cutting station. You can take the lumber you purchase right over to them, and they will cut it to your exact specifications for a very small fee, or sometimes even for free. This is a fantastic service for DIY beginners who haven’t invested in their own saws yet.
How do I style my new shelves so they don’t look cluttered?
The key is balance and breathing room. Don’t fill every inch of space. Vary the height and texture of your objects. A great rule of thumb is the “rule of three”—grouping items in odd numbers is visually appealing. Mix books (some standing, some stacked horizontally) with personal objects, plants, and art. Step back frequently as you style to see how the whole composition looks.

Post Comment