How to Paint Laminate Furniture Without Sanding
Learn how to paint laminate furniture without sanding with our before & after guide. Discover chalk paint ideas and start your furniture flipping journey!
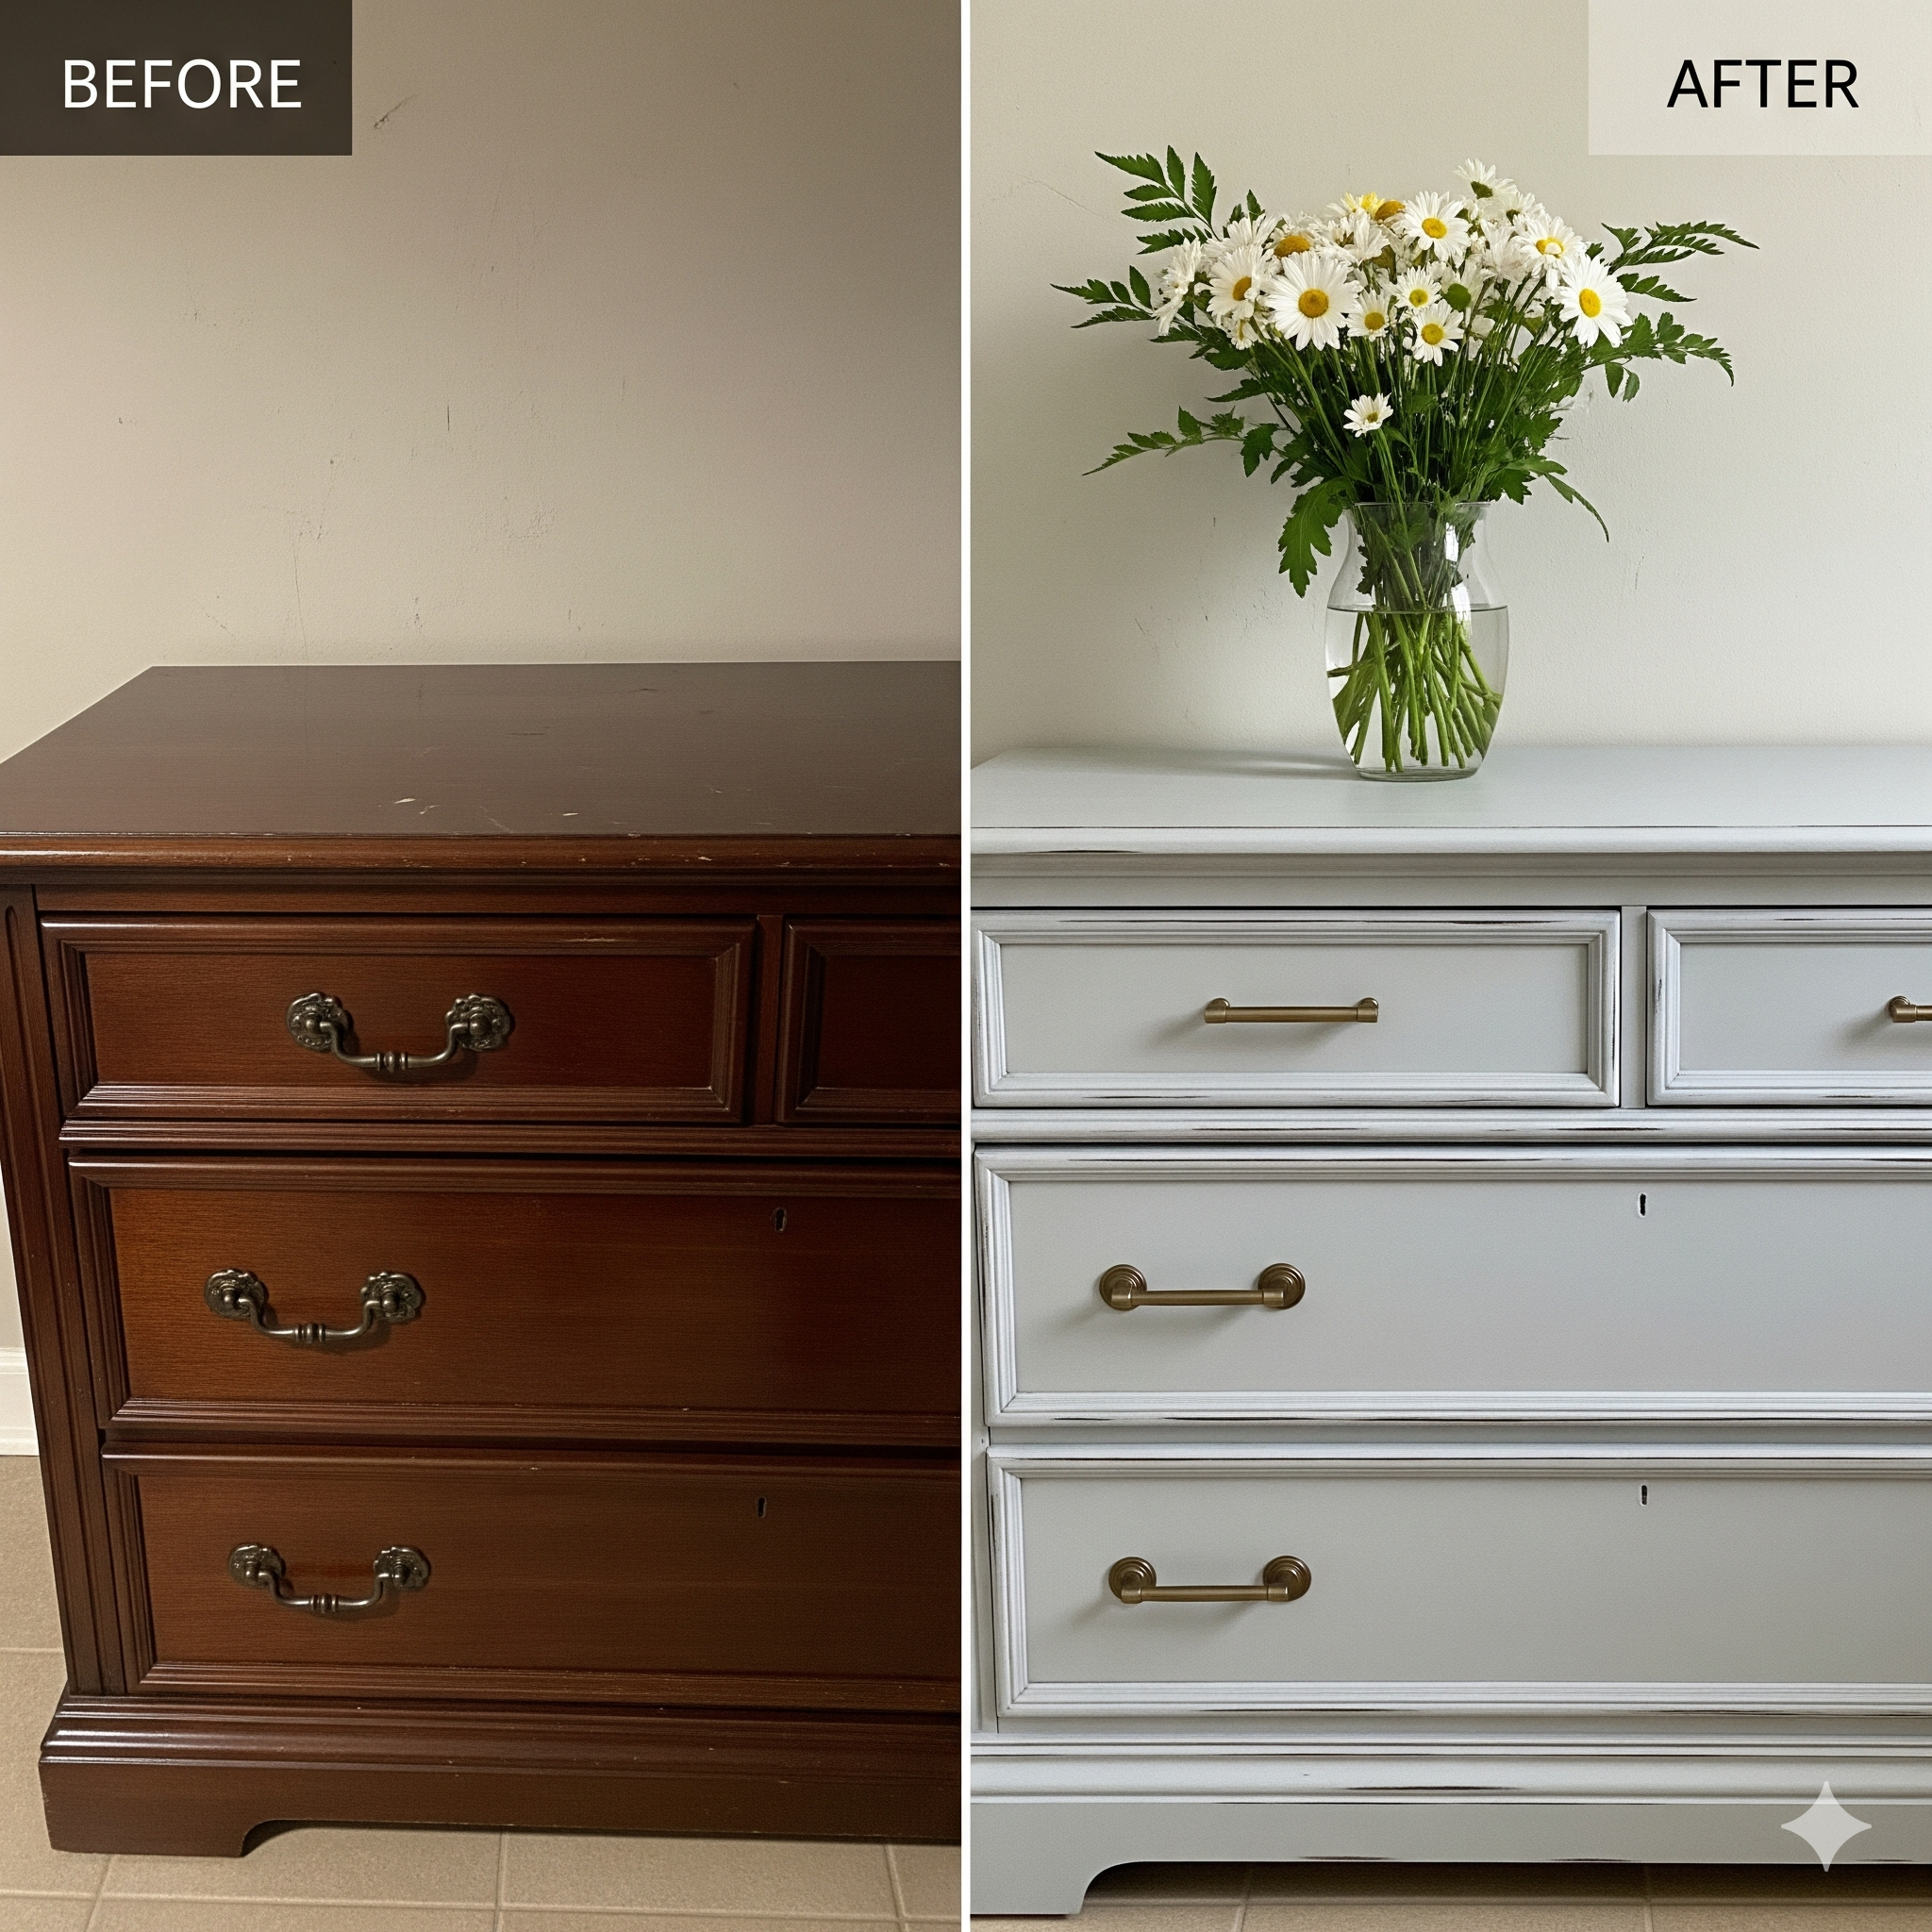
From Drab to Fab: My Step-by-Step Guide to Painting Laminate Furniture (The No-Sanding Way!)
There’s a special thrill that every DIYer knows. It’s the moment you spot it—a sad, forgotten piece of furniture on the curb, at a thrift store, or collecting dust in your own basement. It might be an outdated dresser with a peeling, fake-wood finish, but you don’t see that. You see potential. As the founder of Neat Tiny Home, my entire philosophy is built on seeing the potential in overlooked spaces and items. Upcycling isn’t just about saving money; it’s about creativity, sustainability, and the incredible satisfaction of transforming trash into treasure. It’s the heart and soul of creating a home that is truly, uniquely yours.
But there’s one type of furniture that strikes fear into the hearts of many aspiring upcyclers: the dreaded laminate. That slick, plastic-y, non-wood surface seems impossible to paint. The internet is filled with horror stories of peeling, scratching paint. This has led to the golden question: do you know how to paint laminate furniture without sanding? I’m here to tell you that not only is it possible, but it can also yield a stunning, durable, and professional-looking finish. This guide is my definitive, step-by-step “before and after” journey. We’ll take a sad, dated laminate piece and walk through the entire process, focusing on the secret weapon that makes it all possible: the right prep and the right primer. We’ll explore fantastic chalk paint furniture ideas and get you started on the exciting path of furniture flipping. Get ready to unlock a whole new world of upcycling possibilities.
The Magic of Upcycling: Turning Trash into Treasure
Before we dive into the nitty-gritty of painting, let’s talk about the “why.” Why should you bother with an old piece of furniture when you can buy something new? For me, the answer is threefold. First, sustainability. Every piece of furniture you rescue is one less item in a landfill. It’s a small but powerful act of conscious consumerism. Second, affordability. You can create a custom, high-end looking piece of furniture for the cost of a can of paint and some new hardware. It’s the ultimate secret to budget-friendly decor. And third, and most importantly, character. An upcycled piece has a story. It has a soul that no mass-produced, flat-pack item can ever replicate. It brings a layer of history and personality into your home that is truly priceless.
Developing Your “Thrifter’s Eye”: How to Spot Pieces with Good Bones
Successful upcycling begins with a good find. Over the years, I’ve developed a “thrifter’s eye” for spotting pieces with potential. Here’s what I look for:
- Good Bones: The piece should be structurally sound. Wiggle it. Are the joints tight? A wobbly leg can often be fixed, but a piece that is falling apart might not be worth the effort. –Quality Construction: Open the drawers. Do they slide smoothly? Are they made with dovetail joints? These are signs of a well-made piece, even if the finish is dated.
- Interesting Shapes: Look past the ugly finish and focus on the silhouette. A piece with unique curves, clean mid-century lines, or interesting details is a fantastic candidate for a makeover.
- Functionality: Does the piece fit a need in your home? Don’t just buy something because it’s cheap. Make sure you have a purpose and a place for it.
The Laminate Challenge: Why It’s Different from Wood
So, you’ve found the perfect piece, but it has that signature slick, often fake-wood grain finish. You’ve found a laminate piece. Laminate is essentially a printed photograph of wood grain (or a solid color) glued to a substrate, which is usually particleboard or MDF. Unlike real wood, it has no pores for the paint to soak into. It’s a non-porous, plastic-like surface. This is why if you were to just slap a coat of regular latex paint on it, it would bead up, scratch off with your fingernail, and peel away in sheets. The traditional advice for painting furniture—”sand it down to the raw wood”—is useless here, because there is no raw wood to sand down to. This is why learning the correct method for how to paint laminate furniture without sanding (or with very minimal sanding) is so critical.
The “No Sanding” Myth vs. Reality: The Importance of PREP
Let’s be very clear about the “no sanding” claim. While you are not going to be using a power sander to strip the finish down for hours, you cannot skip the prep work. The key to a lasting finish on laminate is not removing the old surface, but creating a new one that your paint can grip onto. This involves a two-part process: a light “scuff sand” to create microscopic scratches for grip, and the application of a high-adhesion bonding primer. The primer is the real hero here; it’s chemically formulated to stick to difficult surfaces like laminate, glass, and tile, and it creates the perfect surface for your paint to adhere to. So, while it’s a low-sanding method, it is absolutely a high-prep method. That prep is what makes it possible.
Phase 1: The Critical Preparation Stage
I cannot overstate this: your final paint job will only be as good as your prep work. This is the most important phase of the entire project. It’s not the most glamorous part, but it is the secret to a durable, professional-looking finish that won’t scratch or peel. Do not skip these steps! This is the core of the technique for how to paint laminate furniture without sanding.
Step 1: Thorough Cleaning and Degreasing
Furniture, especially pieces found in kitchens or garages, is covered in years of dirt, grease, and furniture polish. The primer will not stick to a dirty surface. First, remove all hardware (knobs, pulls, hinges). Then, give the entire piece a thorough cleaning with a degreasing cleaner. I recommend a TSP (Trisodium Phosphate) substitute, which you can find at any hardware store. Mix it according to the directions and use a scrubby sponge to clean every single surface, inside and out. Follow up with a rag dipped in clean water to rinse off any residue. Let the piece dry completely.
Step 2: Scuff Sanding for Grip
This is the only “sanding” you’ll need to do, and its purpose is not to remove the finish but to dull it and create texture. Take a medium-grit sanding sponge or a piece of 120-150 grit sandpaper and lightly scuff up every surface you plan to paint. You are not trying to remove the pattern; you are just trying to get rid of the sheen. The surface should look dull and feel slightly rough to the touch when you’re done. This gives the primer something to “bite” into. After scuffing, wipe the entire piece down with a tack cloth or a damp microfiber cloth to remove every last bit of sanding dust.
Step 3: Applying a High-Adhesion Primer
This is the magic ingredient. You must use a high-quality bonding or adhesion-promoting primer. Do not use a standard wall-paint primer. You are looking for a primer that specifically says it will stick to glossy surfaces, plastic, or laminate. My absolute go-to, gold-standard products for this are Zinsser B-I-N Shellac-Based Primer or Kilz Adhesion High-Bonding Primer. Apply a thin, even coat to the entire piece using a high-quality brush or a small foam roller. Let it dry according to the manufacturer’s instructions, and then apply a second coat. Your piece might look streaky and ugly at this stage, but don’t worry. You have now created the perfect, grippy surface for your paint.
Phase 2: Painting and Finishing Like a Pro
With your prep work done, the fun part begins! Now that your piece is primed, you have a wide variety of paint options to choose from. This is where you can get creative with color and finish, exploring different chalk paint furniture ideas or opting for a more modern, sleek look. The key to a professional finish is applying multiple thin coats rather than one thick one.
| Paint Type | Finish/Look | Durability | Best For |
|---|---|---|---|
| Chalk Paint | Ultra-matte, velvety | Good (Requires a topcoat) | Distressed, farmhouse, shabby-chic looks. Very beginner-friendly. |
| Alkyd Enamel Paint | Satin or semi-gloss, smooth | Excellent (Self-leveling) | Modern, sleek, high-traffic pieces like dressers and cabinets. |
| Mineral Paint | Matte but with a slight sheen | Very Good (Often has a built-in topcoat) | Durable, modern matte finishes with minimal fuss. |
The Beauty of Chalk Paint Furniture Ideas
Chalk paint is incredibly popular for furniture makeovers, and for good reason. It’s very thick, adheres well, and is extremely easy to work with. Its ultra-matte finish is perfect for creating a vintage or farmhouse look. One of the best things about chalk paint is how easy it is to distress. After you’ve applied your paint, you can simply take a piece of fine-grit sandpaper and lightly sand the edges and details of your piece to allow the color underneath to peek through. This creates a beautifully aged, time-worn look. Brands like Annie Sloan (the original inventor) or Rust-Oleum Chalked offer a huge variety of colors. Chalk paint is a fantastic choice for your first project and a great way to explore creative chalk paint furniture ideas.
The Non-Negotiable Final Step: Applying a Durable Topcoat
Unless you are using a paint with a built-in topcoat, this step is absolutely critical for durability, especially on high-traffic pieces like tabletops or dressers. A topcoat protects your beautiful paint job from scratches, chips, and stains. For chalk paint, a clear finishing wax is often used to seal the paint and give it a soft, velvety sheen. For other types of paint, a water-based polyurethane is the best choice. It won’t yellow over time like oil-based versions. Apply at least two or three thin, even coats with a high-quality brush, lightly sanding with very fine sandpaper between coats for the smoothest possible finish.
Phase 3: The “Jewelry” – Upgrading Hardware and Adding Details
You’ve done all the hard work, and your piece looks amazing. Now it’s time to add the “jewelry” that will take it to the next level. These final details are what truly complete the transformation and make your piece look like an expensive item from a high-end boutique. This is a key part of successful furniture flipping—it’s the details that create the perceived value.
The Transformative Power of New Knobs and Pulls
Never underestimate the power of new hardware. Swapping out the dated, boring knobs for something modern and stylish is the quickest and easiest way to elevate a piece of furniture. You can find beautiful and affordable hardware at The Home Depot, Lowe’s, or online retailers like Hobby Lobby (which often has sales). From sleek brass pulls to crystal knobs, the options are endless. This small investment makes a massive impact and is the finishing touch that ties the whole makeover together.
By following these steps, you can confidently tackle any piece of laminate furniture that comes your way. The “before and after” is more than just a coat of paint; it’s a testament to the power of seeing potential and the joy of creating something beautiful with your own hands.
Frequently Asked Questions (FAQ)
My paint is scratching off even though I used primer. What did I do wrong?
This is almost always due to one of two issues: 1) The surface was not cleaned and degreased thoroughly enough before priming, or 2) The paint was not allowed to fully cure. Most paints, especially durable enamel paints, take up to 30 days to fully harden, or “cure.” You can gently use the piece after a day or two, but you need to be careful during that curing period to avoid scratches. Also, ensure you used a high-adhesion bonding primer, not just a standard drywall primer.
Can I use a paint sprayer for a smoother finish?
Absolutely! If you have a paint sprayer, it’s a fantastic way to get a perfectly smooth, brush-stroke-free finish. The key is to properly thin your paint according to the sprayer’s instructions and to apply several very thin coats rather than one heavy one. It’s a great tool for anyone who plans to do a lot of furniture flipping.
How do I decide whether a piece is worth upcycling or if it’s just junk?
My rule is to focus on structure over surface. An ugly finish, dated color, or hideous hardware can all be changed easily. A cracked frame, warped top, or drawers that are falling apart are much bigger problems. If the piece is solid and functional, it’s almost always worth saving. For more inspiration on seeing the potential in old pieces, I highly recommend browsing the “before and after” projects on a blog like The Navage Patch.

Post Comment